Understanding How Graal Works - a Java JIT Compiler Written in Java
Chris Seaton, 3 November 2017
These are the notes for a talk I gave at JokerConf 2017, which is why they’re written as if we were talking and going through some slides together.
One of the reasons that I’m a programming language researcher is that almost everyone I meet in the the wider computer technology community uses programming languages and many of them are interested in how they work. When I was first introduced to programming as a small child and shown a programming language, the first thing I wanted to know was how did the language work, and one of the first things I wanted to do was to implement my own language.
What I’m going to do today in this talk is show you something about how the programming language you all use, Java, works. What’s different is that I’m going to use a project called Graal that implements Java in Java, so that I can show you how Java works, using Java.
Graal is just one part of how Java works though - it’s a just-in-time compiler. This is the part of a JVM that converts Java bytecode to native machine code at runtime, and it’s a big part of what makes Java as high performance as it is. It’s also what many people I think would consider to be one of the most complex and opaque parts of the JVM that they may think is outside what they can understand, and this talk aims to help change that.
If you know what a JVM is, you know broadly what those two terms mean - bytecode and machine code - and you can read everyday Java code then you will have enough to follow me I hope.
I’m going to talk about why we would want to write a new JVM JIT-compiler in Java itself, and then I’m going to start showing you it’s not as special as you may think it is, by diving into building it, using it, and starting to show you how the code is just as understandable as any other application.
I’ll talk about just a little bit of the theory but then I’ll show you how this is applied to compile a method all the way from the bytecode to the machine code. I’ll show some more details, and then finally I’ll talk about why this is a good thing to have beyond being interesting to have more of Java implemented in Java for the sake of it.
I’m going to use screenshots of Eclipse, rather than running it during the presentation, to avoid the inevitable embarrassments of trying to live code.
What is a JIT compiler?
I’m sure many of you know what a JIT-compiler is, but I’ll just cover the basics so nobody is sitting there afraid to ask that fundamental question.
When you run the javac command, or compile-on-save in your IDE, your Java
program is compiled from Java source code into JVM bytecode. This is a binary
representation of your Java program. It’s more compact and simpler than the
source code. However a conventional processor in your laptop or server can’t
actually execute JVM bytecode.
To run your Java program then the JVM interprets the bytecode. Interpreters are often a lot slower than native code running on a real processor, so the JVM at runtime can also run another compiler, this time compiling your bytecode to the machine code that your processor can actually run.
This compiler is usually a lot more sophisticated than the javac compiler,
running complex optimisations to produce high quality machine code.
Why write a JIT compiler in Java?
The OpenJDK implementation of the JVM contains two conventional JIT-compilers today. The client compiler, also called C1, is designed to run more quickly and produce less optimised code. The server compiler, also called opto, or C2, is designed to take a little more time to run but to produce better optimised code.
The idea was that the client compiler was better for desktop applications, where longer pauses for JIT-compilation are annoying, and the server compiler was better for long-running server applications which can spend more time on compilation.
Today they can be combined, so that code is compiled with C1 first and then C2 later if they are still being executed a lot and it looks worth spending the extra time. This is called tiered compilation.
Let’s focus on C2 - that was the server compiler which optimises more.
We can clone OpenJDK from a GitHub mirror, or we can browse it directly on the website.
$ git clone https://github.com/dmlloyd/openjdk.git
The code for C2 is located at openjdk/hotspot/src/share/vm/opto.
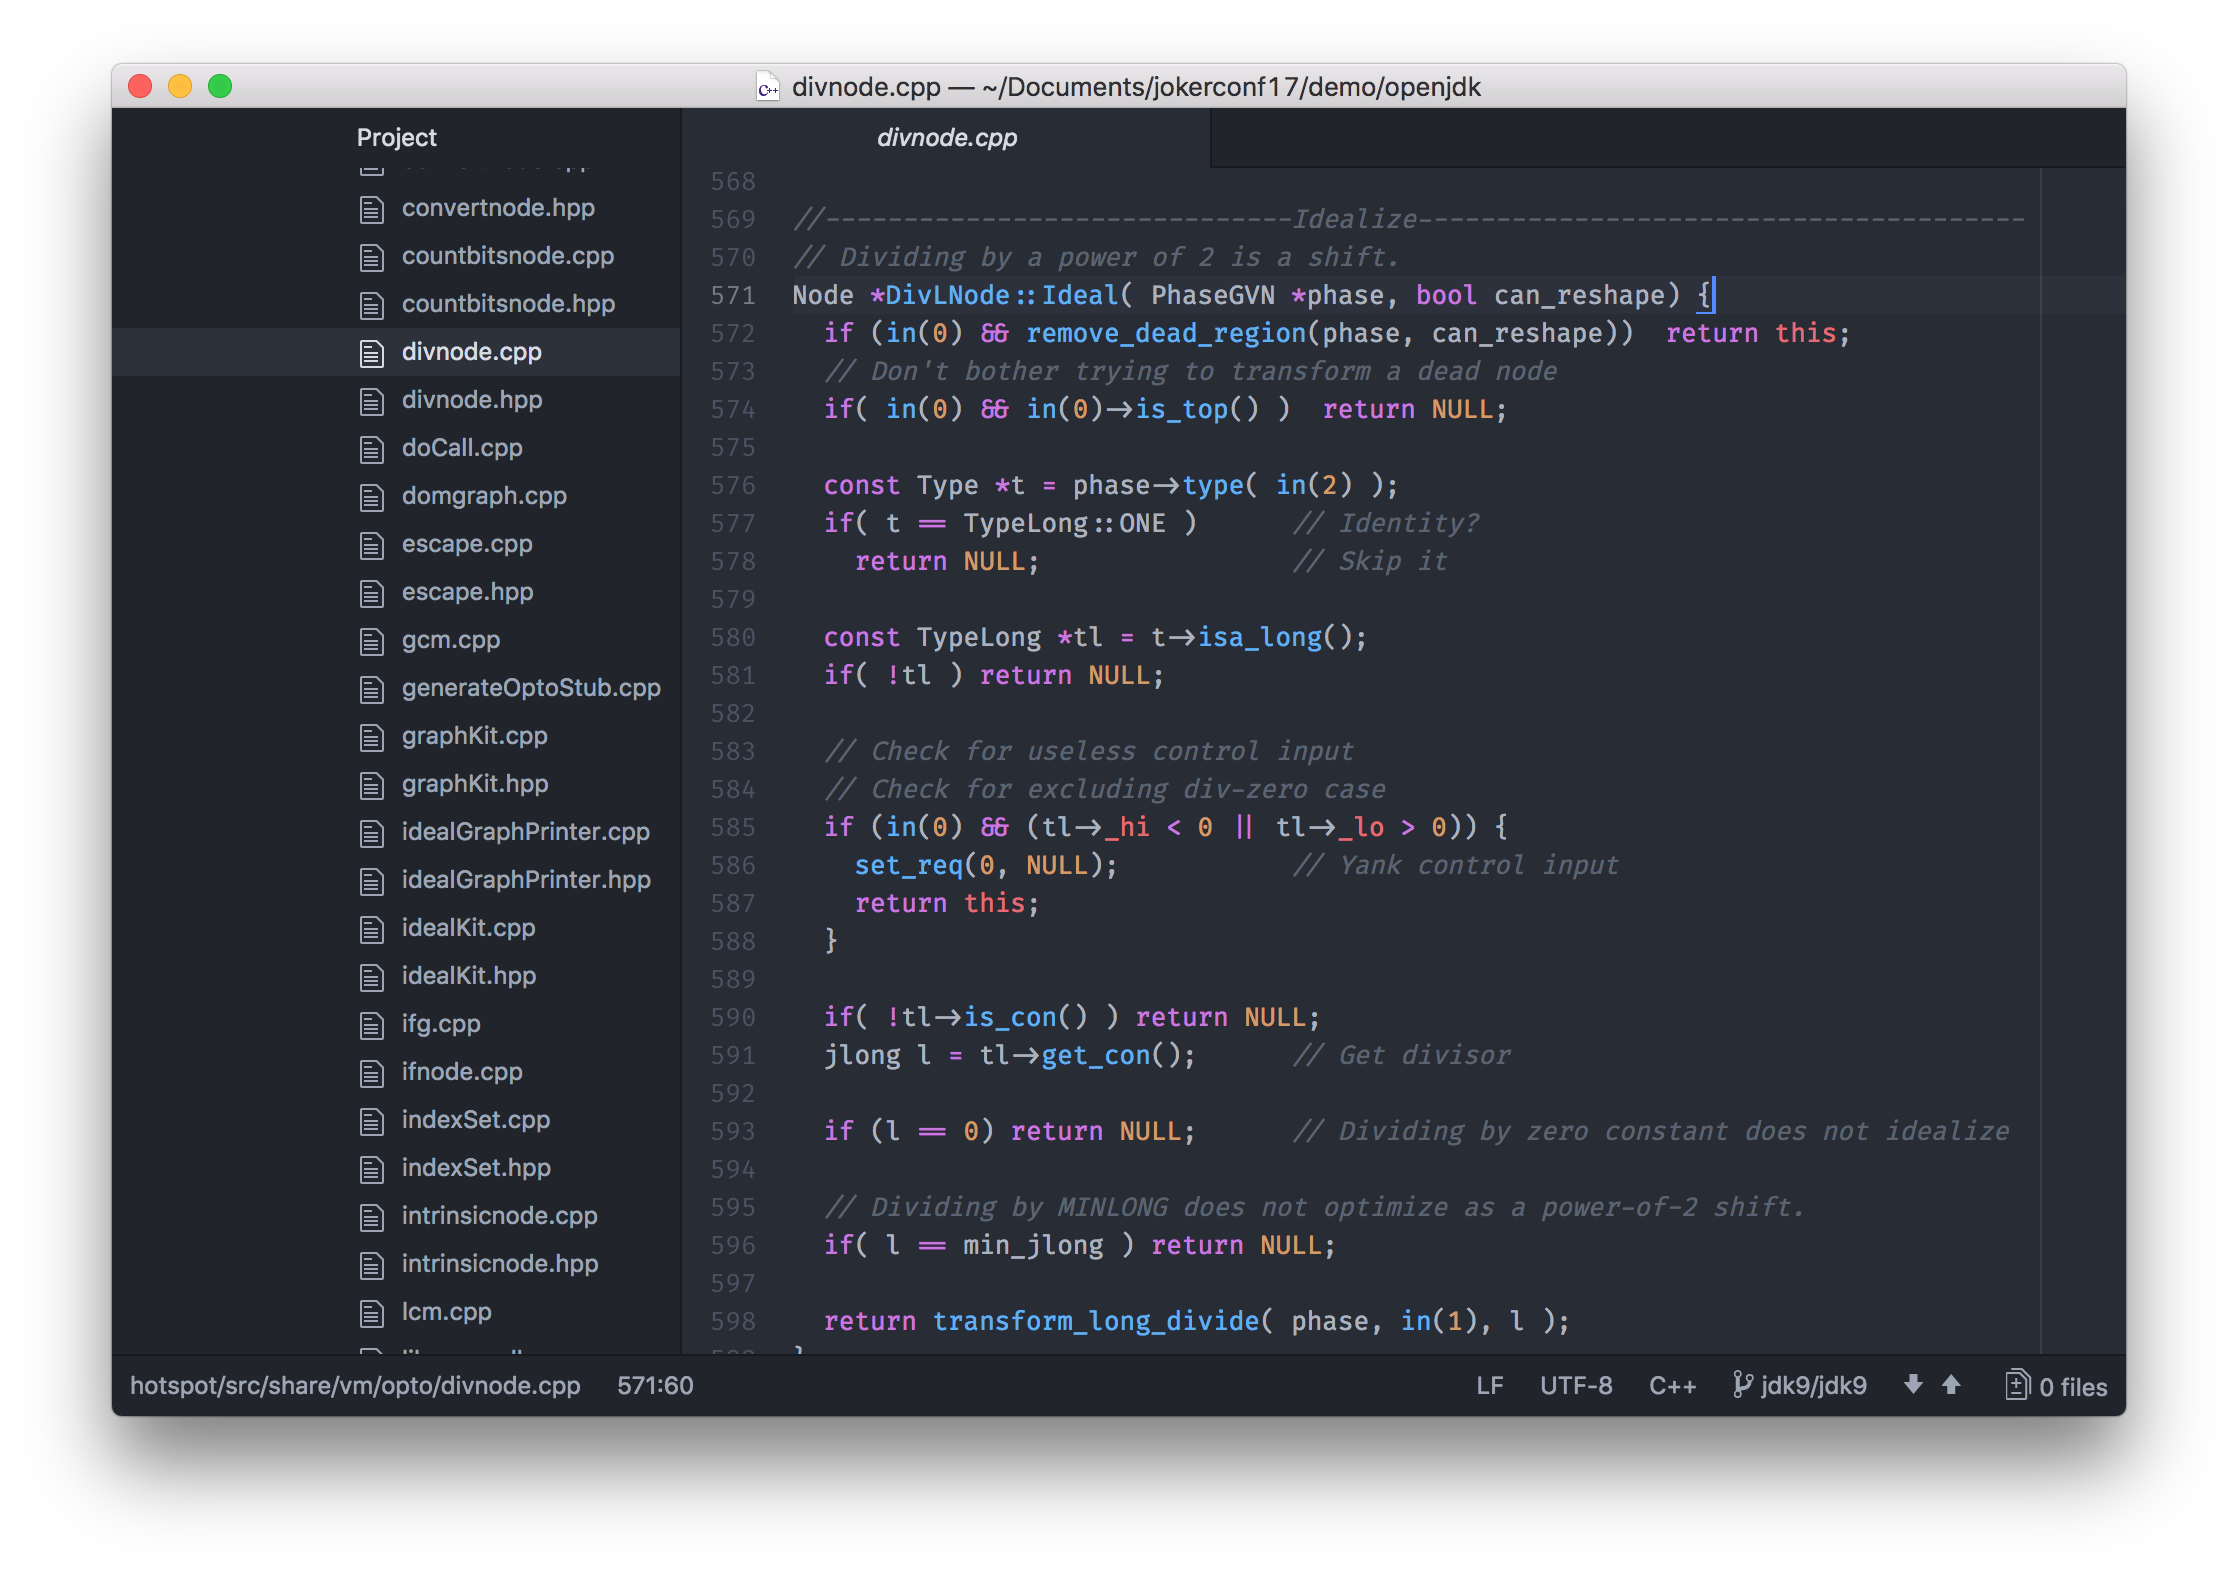
First of all, C2 is written in C++. There’s of course nothing inherently wrong with C++, but it does have issues. C++ is an unsafe language - meaning that errors in C++ can cause the VM to crash. It’s probably also just the age of the code, but the C++ code in C2 has become very hard to maintain and extend.
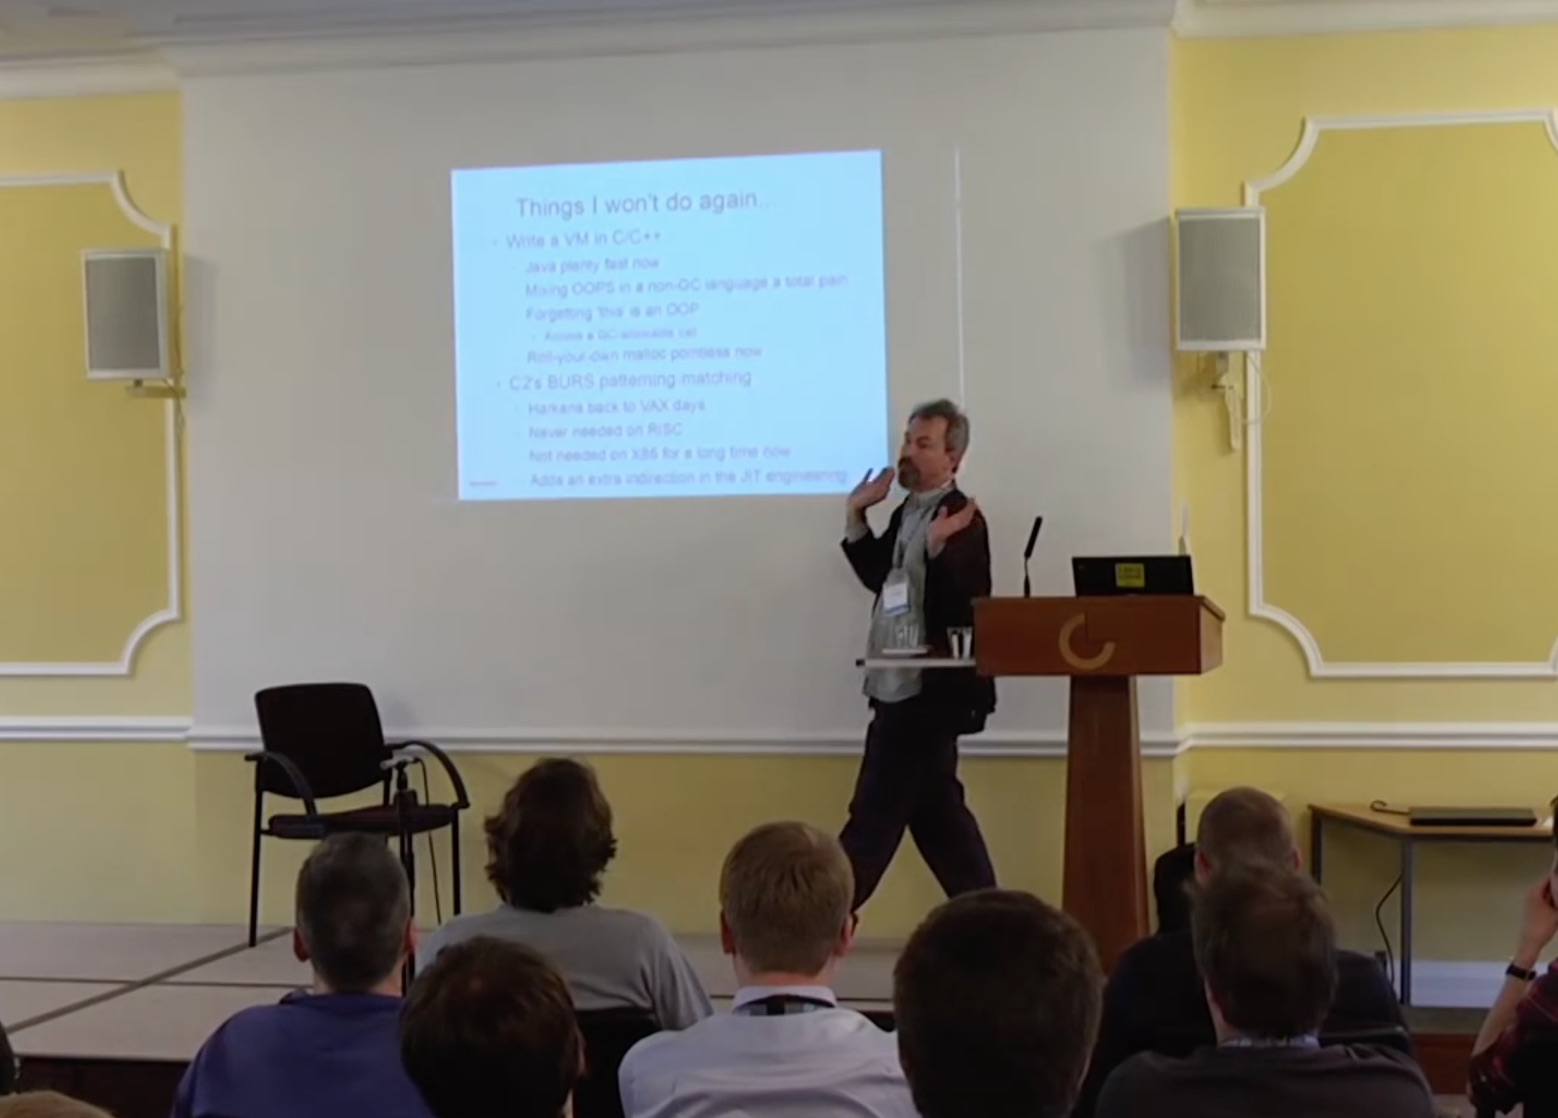
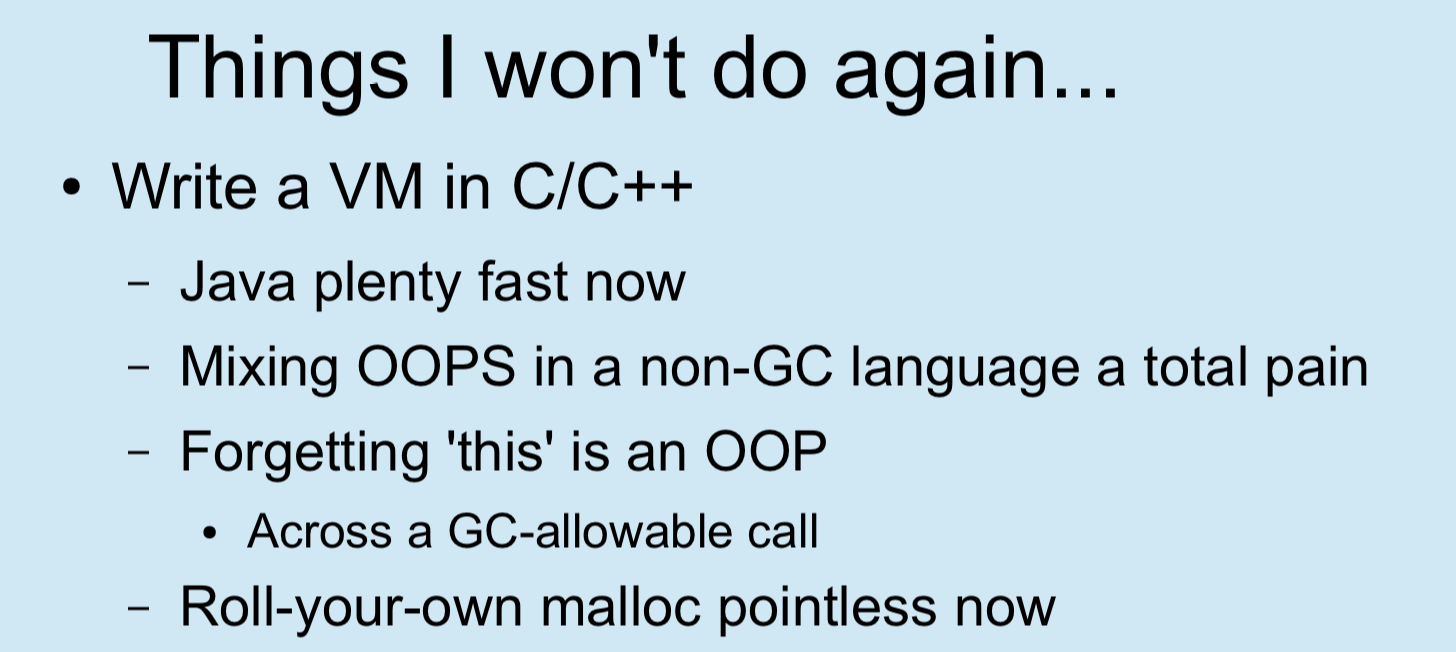
One of the key people behind the C2 compiler, Cliff Click, has said that he would never write a VM in C++ again, and we’ve just heard that Twitter’s JVM team have said that they think that C2 have become stagnant and is past needing replacement because development is so difficult.
So, going back to the question, what is it about Java that helps solve these problems? Well, it’s all the same things that mean you write your applications in Java rather than C++. So that’s probably safety - exceptions rather than crashes, no real memory leaks or dangling pointers - good tooling, like being able to use debuggers, profilers, and tools like VisualVM - good IDE support, and more.
You may think but how is it possible to write something like a JIT-compiler in
Java? You may think that this could only be possible in a low level systems
language like C++, but I hope to convince you in this talk that this isn’t true
at all! In fact a JIT-compiler just needs to be able to accept JVM bytecode and
produce machine code - you give it a byte[] in and you want a byte[] back.
It will do a lot of complex things to work out how to do that, but they don’t
involve the actual system at all so they don’t need a ‘systems’ language, for
some definition of systems language that doesn’t include Java, like C or C++.
Setting up Graal
The first thing we need is Java 9. The interface that Graal uses, called JVMCI, was added to Java as JEP 243 Java-Level JVM Compiler Interface, and the first version to have this was Java 9. I’m using 9+181. There are backports to Java 8 available if people have special requirements.
$ export JAVA_HOME=`pwd`/jdk9
$ export PATH=$JAVA_HOME/bin:$PATH
$ java -version
java version "9"
Java(TM) SE Runtime Environment (build 9+181)
Java HotSpot(TM) 64-Bit Server VM (build 9+181, mixed mode)
The next thing we need is a build tool, called mx. This is a bit like Maven or
Gradle, but it’s probably not something you’d ever chose for your own
applications. It has some special logic to support some complex use-cases, but
we’re just going to use it to do a simple build.
We can clone mx from GitHub. I’m using commit 7353064. Then just add the
executable to our PATH.
$ git clone https://github.com/graalvm/mx.git
$ cd mx; git checkout 7353064
$ export PATH=`pwd`/mx:$PATH
Then we want to clone Graal itself. I’m using the version from a distribution called GraalVM, version 0.28.2.
$ git clone https://github.com/graalvm/graal.git --branch vm-enterprise-0.28.2
This repository contains some other projects we aren’t interested in right now,
so we just want to switch to the compiler sub-project, which is the Graal
JIT-compiler itself, and build that using mx.
$ cd graal/compiler
$ mx build
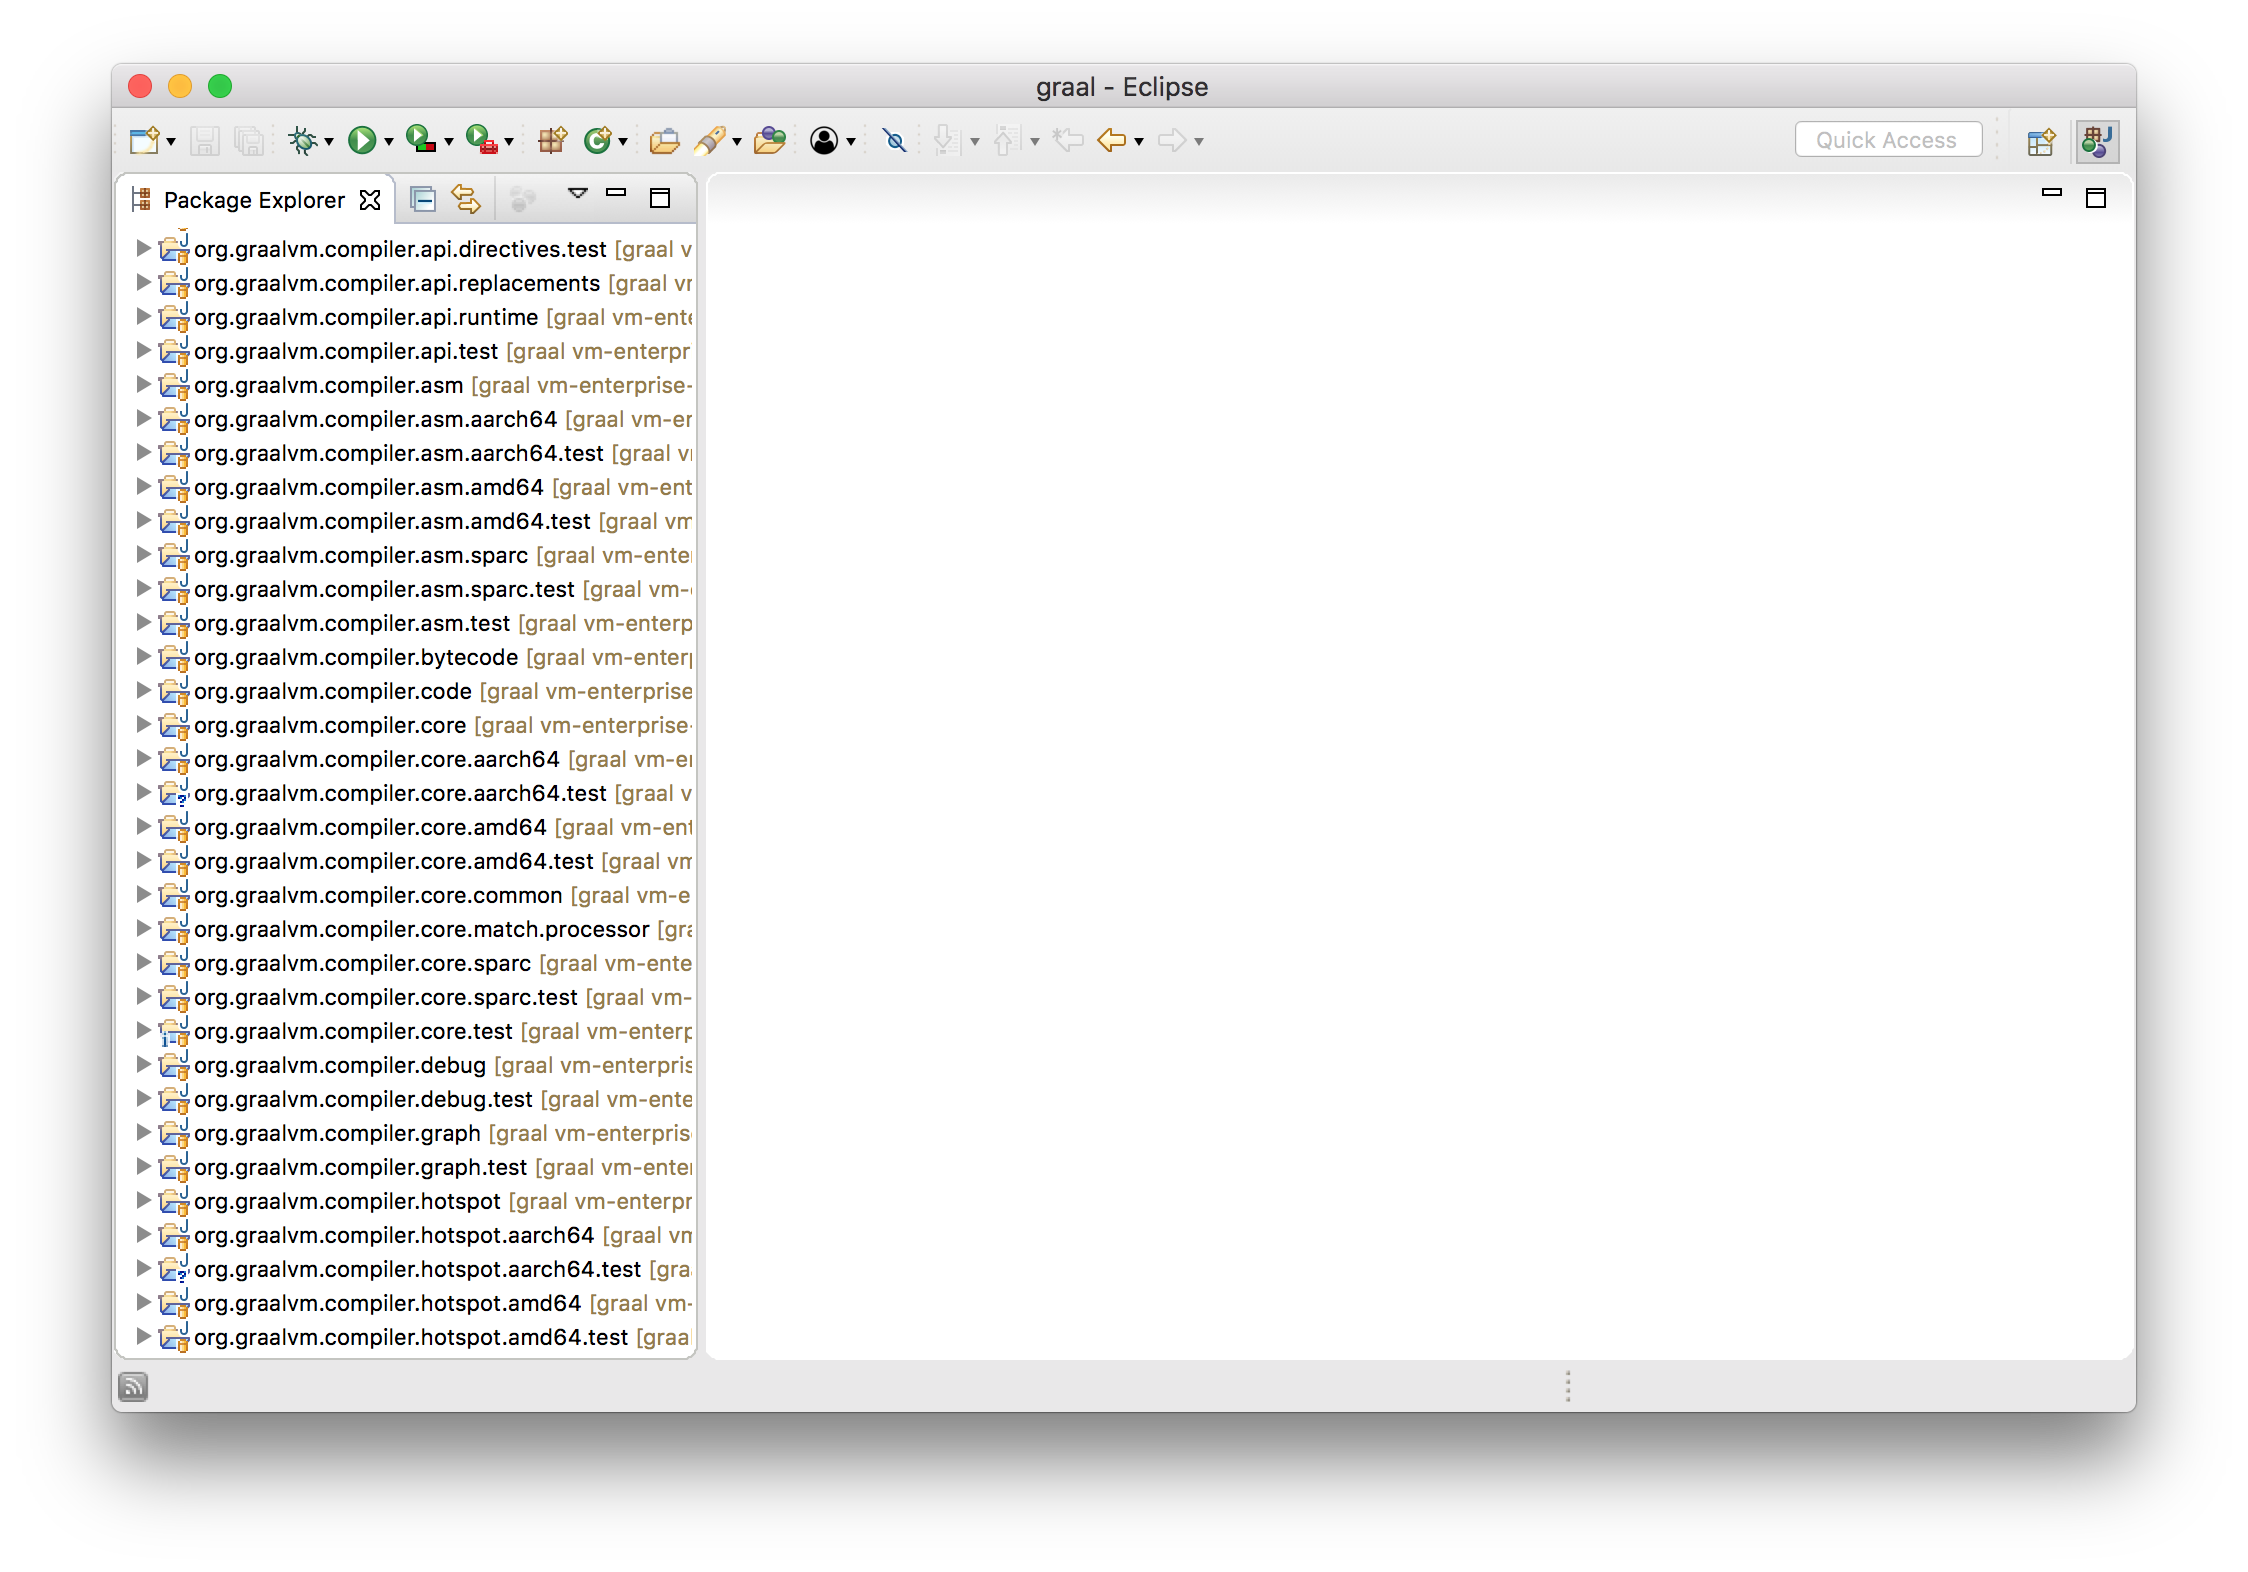
Now I’m going to use the Eclipse IDE to open the Graal source code. I’m using
Eclipse 4.7.1. mx can generate an Eclipse project definition for us.
$ mx eclipseinit
You will want to open the graal directory as workspace, then do File,
Import…, General, Existing projects and select the graal directory
again. You may then need to attach the JDK sources if you aren’t running Eclipse
itself with Java 9.
Ok now that we have everything ready, let’s show this working. We’ll use this very simple code.
class Demo {
  public static void main(String[] args) {
    while (true) {
      workload(14, 2);
    }
  }

  private static int workload(int a, int b) {
    return a + b;
  }
}
We’ll compile that with javac, and then we’ll run the JVM. First of all I’ll
show you the conventional C2 JIT-compiler working. To do this I’ll turn on a
couple of flags, -XX:+PrintCompilation which tells the JVM to log when a
method is compiled, and I’ll use -XX:CompileOnly=Demo::workload so that only
that method is compiled. If we don’t do this the volume of output is a bit
overwhelming and the JVM will be more clever than we want and optimise away the
code we want to look at.
$ javac Demo.java
$ java \
  -XX:+PrintCompilation \
  -XX:CompileOnly=Demo::workload \
  Demo
...
    113    1       3       Demo::workload (4 bytes)
...
I won’t explain that beyond saying that is the log entry which shows that the
workload method is being compiled.
Now we’re going to use the Graal that we just built as our JIT-compiler in our Java 9 JVM. We need to add some more complicated flags here.
--module-path=... and --upgrade-module-path=... add Graal to the module
path. Remember that the module path is new in Java 9 as part of the Jigsaw
module system, and you can think of it as being like the classpath for our
purposes here.
We need -XX:+UnlockExperimentalVMOptions because JVMCI (the interface that
Graal uses) is just experimental at this stage.
We then use -XX:+EnableJVMCI to say that we want to use JVMCI, and
-XX:+UseJVMCICompiler to say that we actually want to use it and to install a
new JIT compiler.
We use -XX:-TieredCompilation to disable tiered compilation to keep things
simpler and to just have the one JVMCI compiler, rather than using C1 and then
the JVMCI compiler in tiered compilation.
And we still use -XX:+PrintCompilation and -XX:CompileOnly=Demo::workload as
before.
Just as before, we see that one method being compiled. We’ve now used the Graal that we just built to do the compilation though. For the moment you’ll just have to take my word for that.
$ java \
  --module-path=graal/sdk/mxbuild/modules/org.graalvm.graal_sdk.jar:graal/truffle/mxbuild/modules/com.oracle.truffle.truffle_api.jar \
  --upgrade-module-path=graal/compiler/mxbuild/modules/jdk.internal.vm.compiler.jar \
  -XX:+UnlockExperimentalVMOptions \
  -XX:+EnableJVMCI \
  -XX:+UseJVMCICompiler \
  -XX:-TieredCompilation \
  -XX:+PrintCompilation \
  -XX:CompileOnly=Demo::workload \
  Demo
...
    583   25             Demo::workload (4 bytes)
...
The JVM compiler interface
What we’ve done there is quite extraordinary isn’t it? We had a JVM installed, and we replaced the JIT-compiler in it to a new one that we just compiled without having to change anything in the JVM. What makes this possible is a new interface in the JVM called the JVMCI - the JVM compiler interface - this is what I said was JEP 243 and had gone into Java 9.
The idea is analogous to some other existing JVM technologies.
You may have added custom source code processing to the javac compiler in the
past using the Java annotation processing API. This lets you recognise Java
annotations and a model of the Java source code they’re attached to and produce
new source files from them.
You may have also added custom Java bytecode processing to the JVM using Java agents. These allow you to intercept Java bytecode as it’s loaded and modify it.
The JVMCI is similar in idea to these. It lets you plug in your own Java JIT-compiler, written in Java.
At this point I’ll say something about the approach I’ve taken to showing code in this presentation. I’ll show slightly simplified identifiers and logic as text on the slides to help you understand the idea at first, and then I’ll switch to screenshots of Eclipse to show you the actual code, which may be a bit more complicated but the big idea will be the same. A big part of this talk is about showing that you really can dive into the real code, so I don’t want to hide it even if it is a little bit complex.
This is where I want to start dispelling the idea that you may have that a JIT-compiler is going to be extremely complicated.
What does a JIT-compiler take in as input? It takes the bytecode of the method it is compiling, and bytecode is, as the name suggests, just an array of bytes.
What does a JIT-compiler produce as output? It produces machine code compiled from the method. Machine code is also just an array of bytes.
So the interface that you need to implement when you write a new JIT-compiler and plug it into the JVM will look something like this.
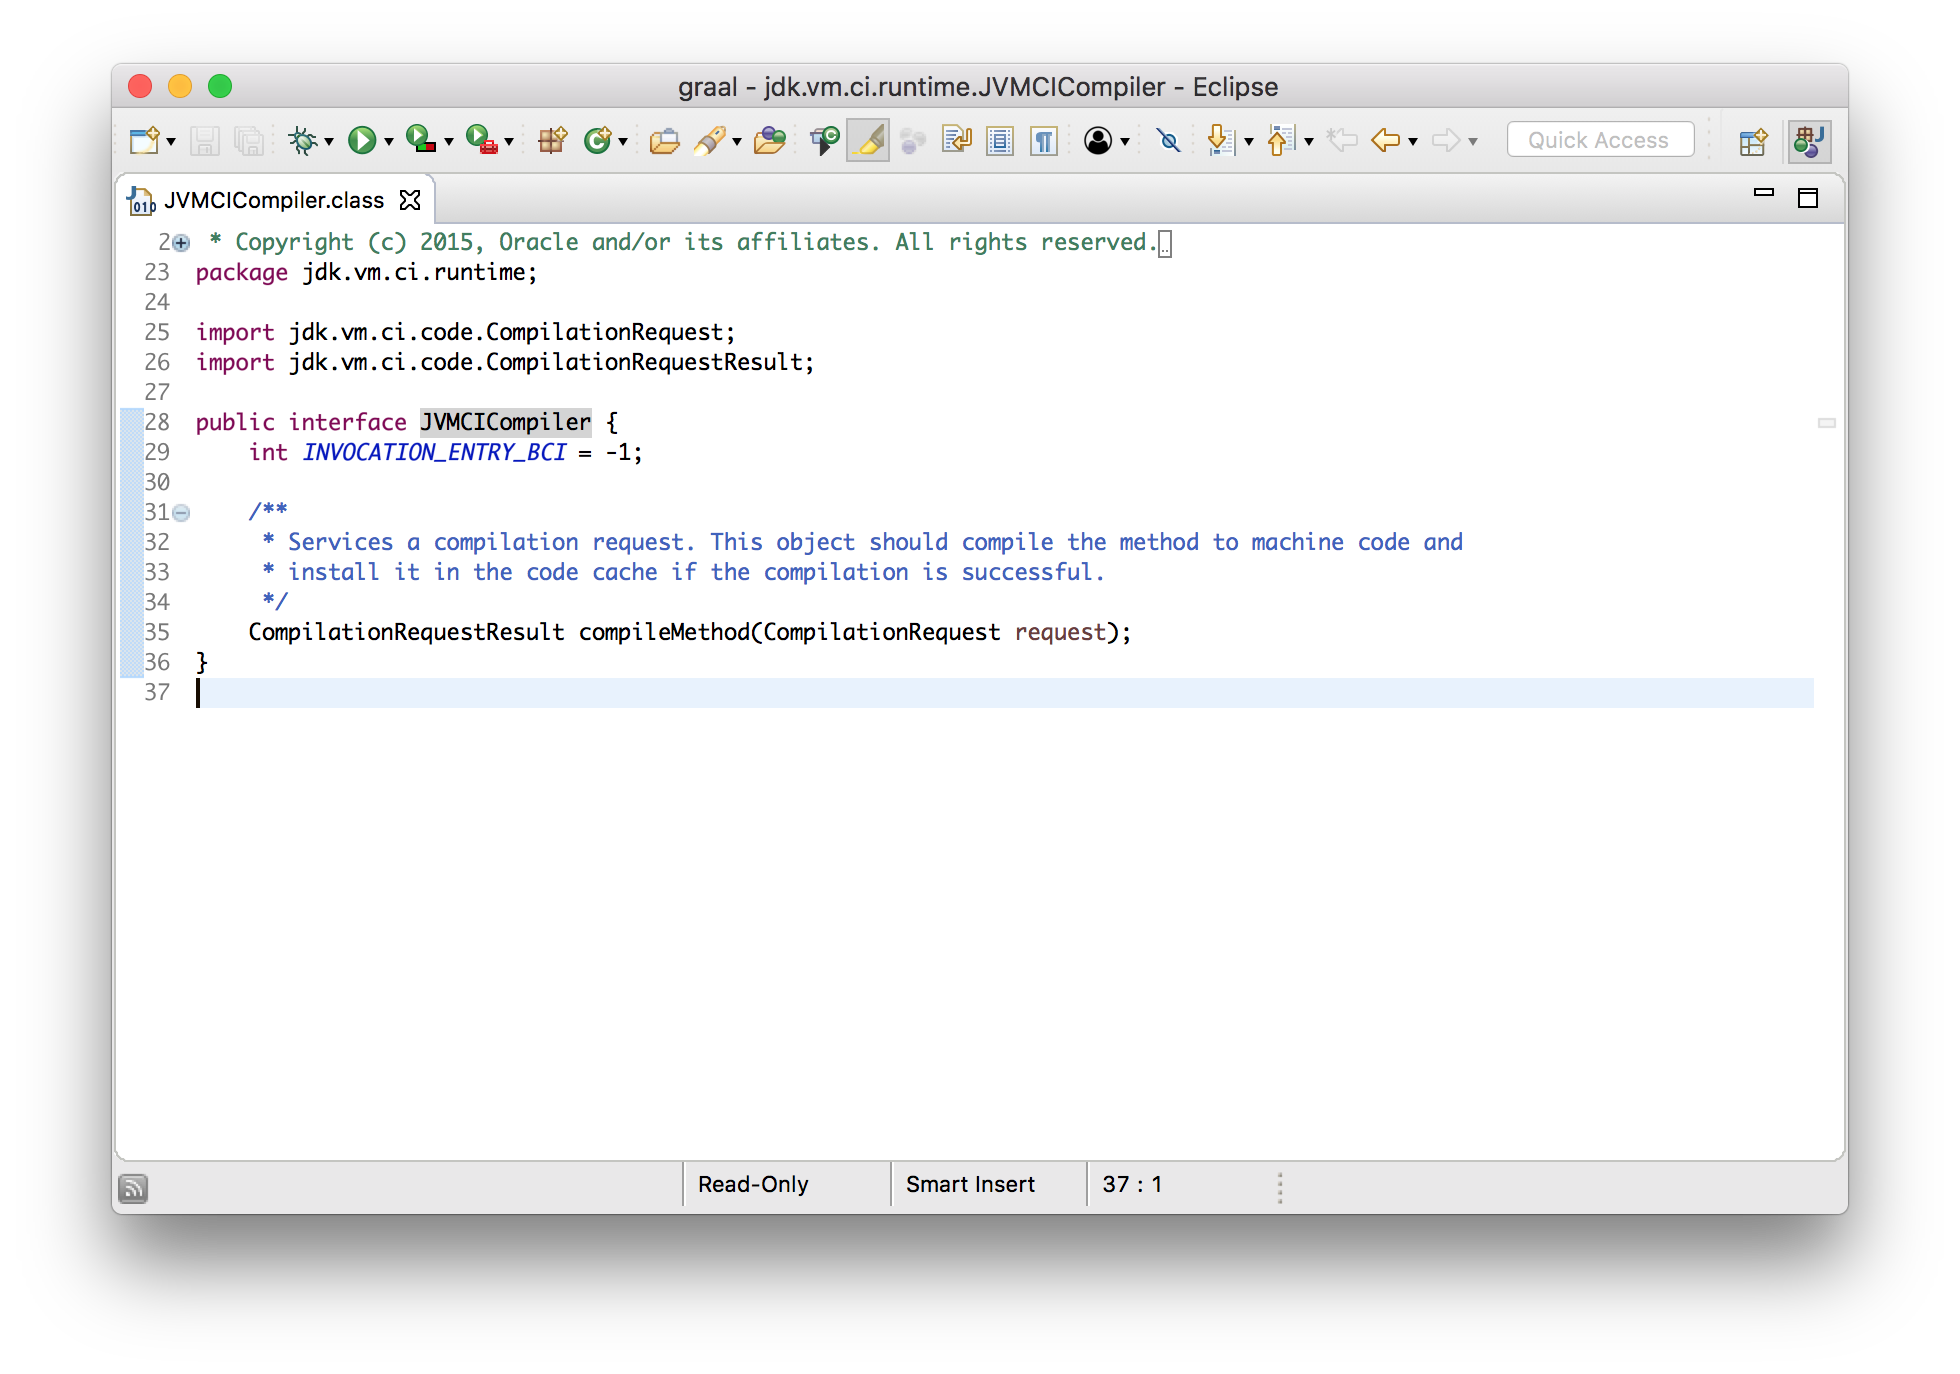
interface JVMCICompiler {
    byte[] compileMethod(byte[] bytecode);
}
So if you were thinking how can Java do something as low level as JIT-compile to
machine code, it’s not as low level as you thought is it? It’s a pure function
from byte[] to byte[].
In reality it’s actually a little more complex than that. Just the bytecode
isn’t quite enough - we also want some information like the number of local
variables, the size of stack needed, and information collected from profiling in
the interpreter so that we know how the code is running in practice. So we’ll
say instead that the input is a CompilationRequest, which tells us which
JavaMethod we want to compile, and say that this can give us all the
information we need.
interface JVMCICompiler {
  void compileMethod(CompilationRequest request);
}

interface CompilationRequest {
    JavaMethod getMethod();
}

interface JavaMethod {
    byte[] getCode();
    int getMaxLocals();
    int getMaxStackSize();
    ProfilingInfo getProfilingInfo();
    ...
}
Also, the interface doesn’t have you return the compiled machine code - instead you call another API to tell the JVM that you want to install some machine code.
HotSpot.installCode(targetCode);
Now to write a new JIT-compiler for the JVM we just need to implement this
interface. We get the information about the method that we want to compile, and
it’s then over to us to compile it to machine code and call installCode.
class GraalCompiler implements JVMCICompiler {
  void compileMethod(CompilationRequest request) {
    HotSpot.installCode(...);
  }
}
Let’s switch to the Eclipse IDE with Graal in it to see what some of these interfaces and classes look like in practice. As I’ve said, they’ll be a little more complicated, but not much more.
What I want to do now is to show you that we can modify Graal and immediately use it in Java 9. I’ll add my own logging message that just says when Graal is compiling a method, and I’ll add this to the interface method that JVMCI calls.
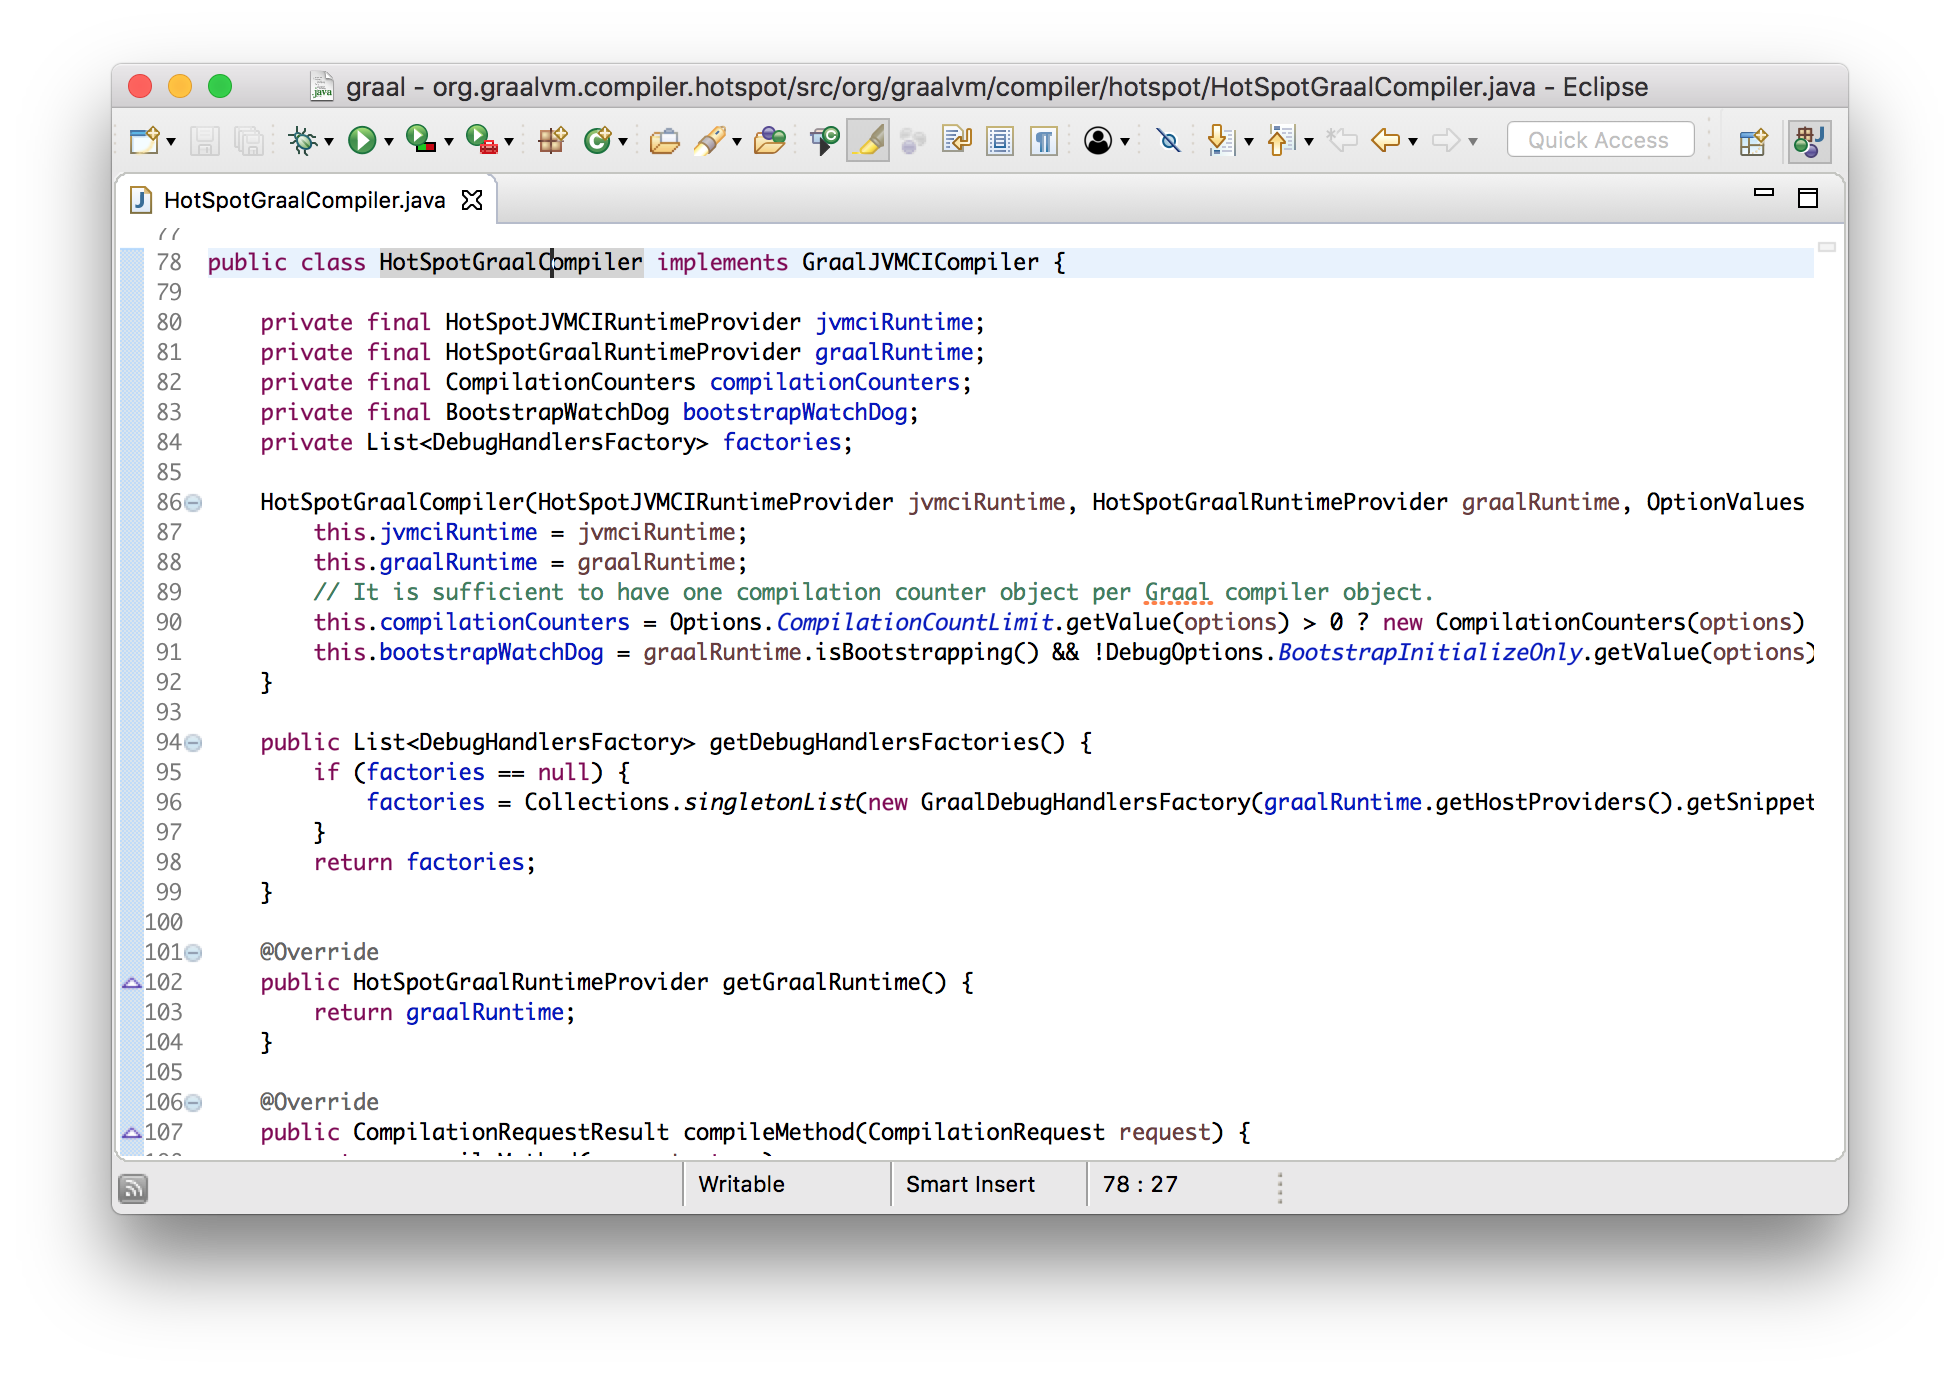
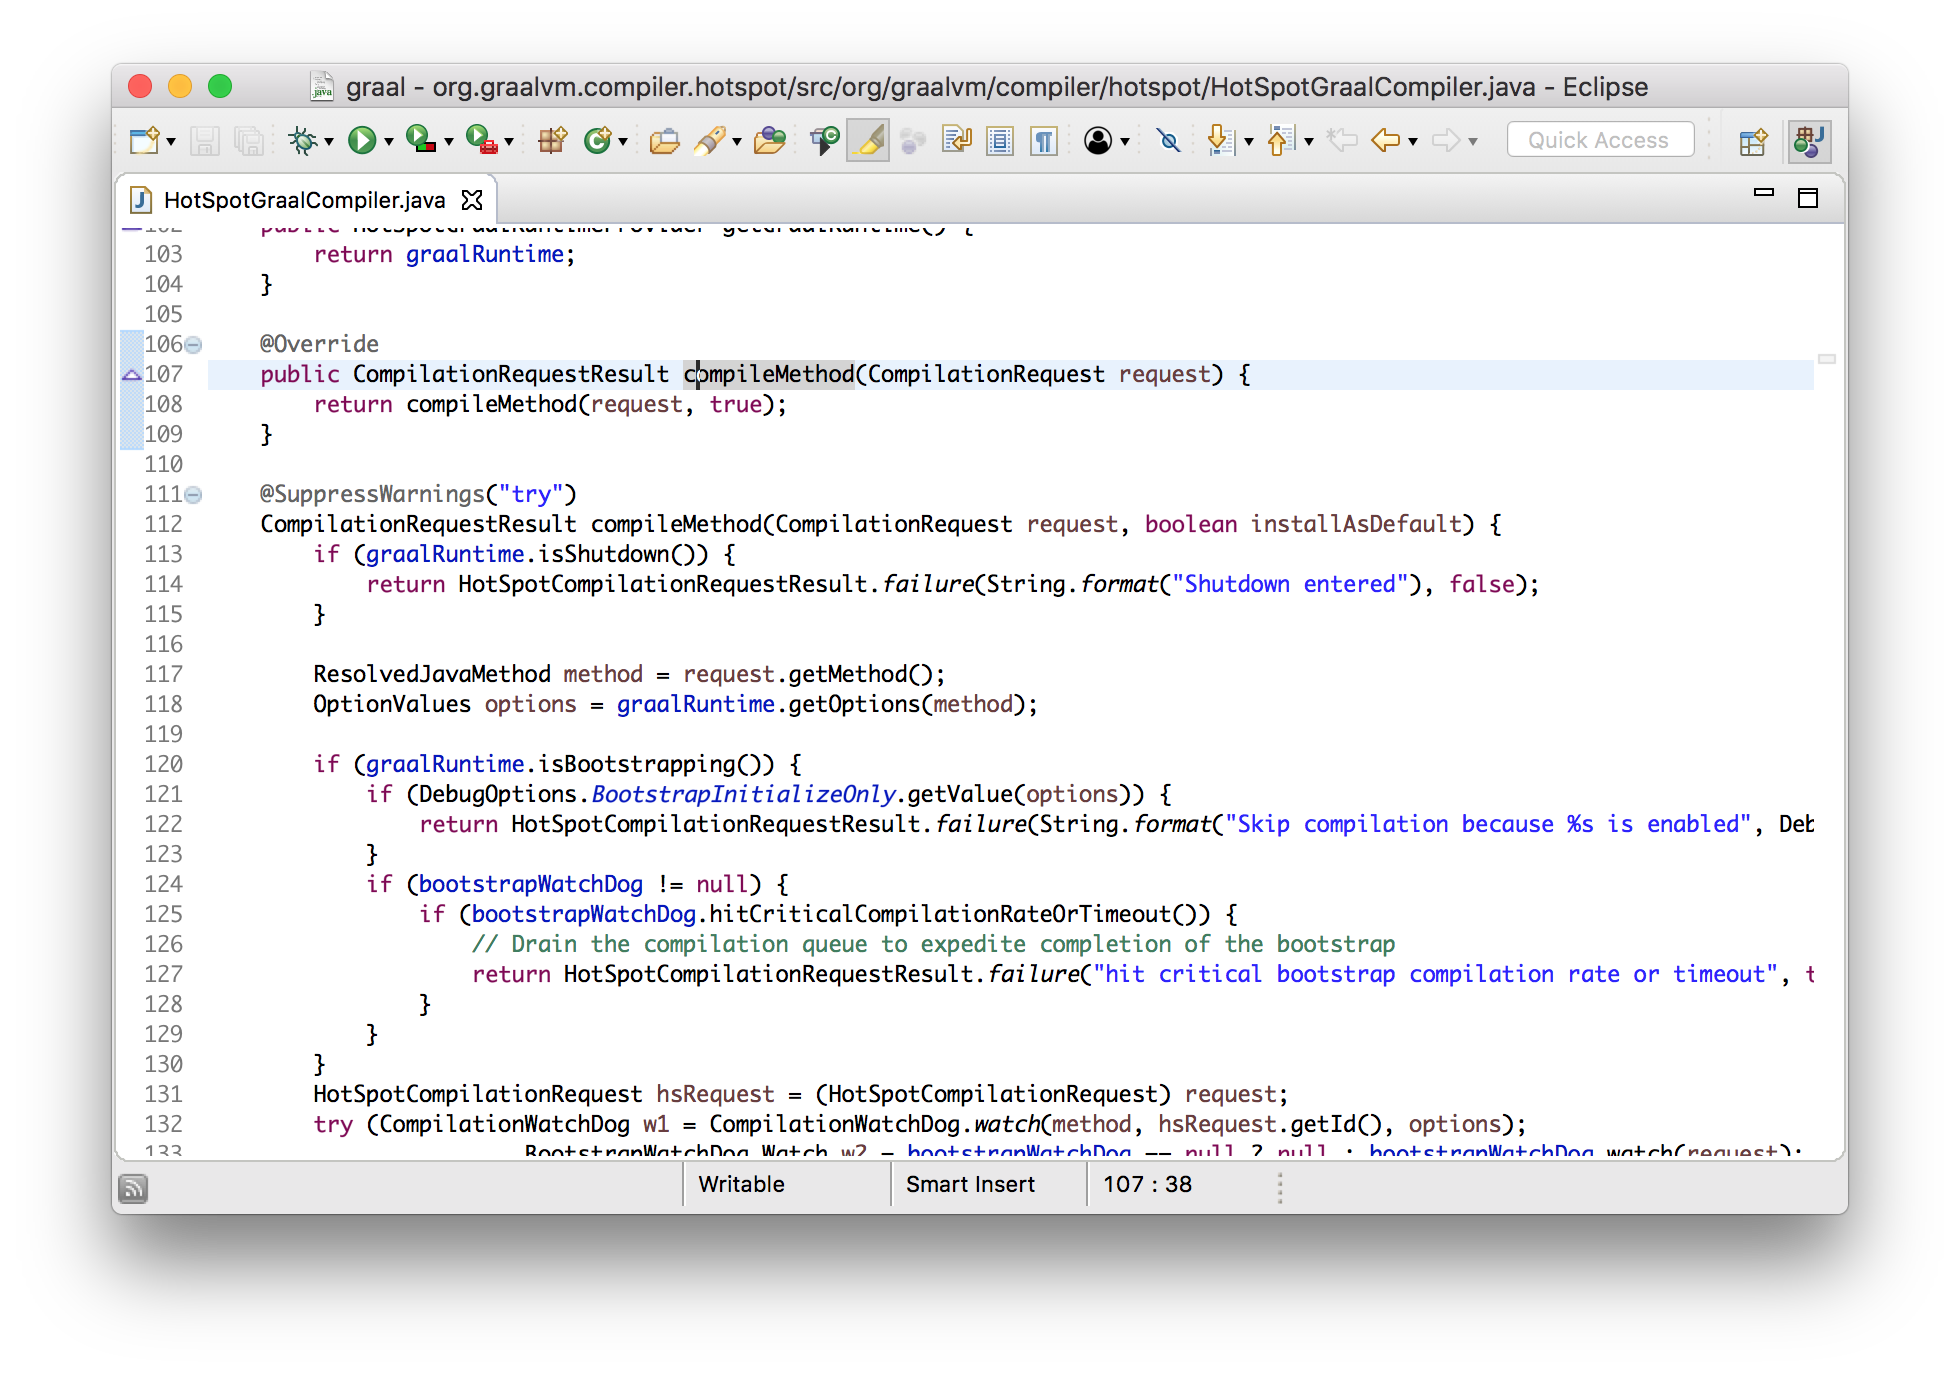
class HotSpotGraalCompiler implements JVMCICompiler {
  CompilationRequestResult compileMethod(CompilationRequest request) {
    System.err.println("Going to compile " + request.getMethod().getName());
    ...
  }
}

I’m going to turn off the normal HotSpot compilation logging now. We can see our message printed from our modified version of the compiler.
$ java \
  --module-path=graal/sdk/mxbuild/modules/org.graalvm.graal_sdk.jar:graal/truffle/mxbuild/modules/com.oracle.truffle.truffle_api.jar \
  --upgrade-module-path=graal/compiler/mxbuild/modules/jdk.internal.vm.compiler.jar \
  -XX:+UnlockExperimentalVMOptions \
  -XX:+EnableJVMCI \
  -XX:+UseJVMCICompiler \
  -XX:-TieredCompilation \
  -XX:CompileOnly=Demo::workload \
  Demo
Going to compile workload
If you try that edit on your own in Eclipse you’ll notice that we don’t even
have to run our build system, mx build, there. The normal Eclipse compile on
save is enough. And we certainly don’t have to recompile the JVM itself. We can
just plug our newly modified compiler into the existing JVM.
The Graal graph
Ok, so we know that Graal converts one byte[] into another byte[]. Let’s now
talk about a little bit of the theory and data structures that it uses to do
that, because it’s a little unusual, even for a compiler.
Fundamentally what a compiler does is to work with and manipulate your program. To do this it needs to represent your program using some kind of data structure. Bytecode and similar lists of instructions is one way, but it’s not very expressive.
Instead, Graal uses a graph to represent your program. If you have a simple addition operator that adds two local variables, the graph is one node to load each local variables, one node to add them, and two edges to say that the result of loading the local variables goes into the addition operation.
This is sometimes called a program-dependence-graph.
If we have an expression like x + y, we get nodes for the local variables x
and y, and a node that adds them together.
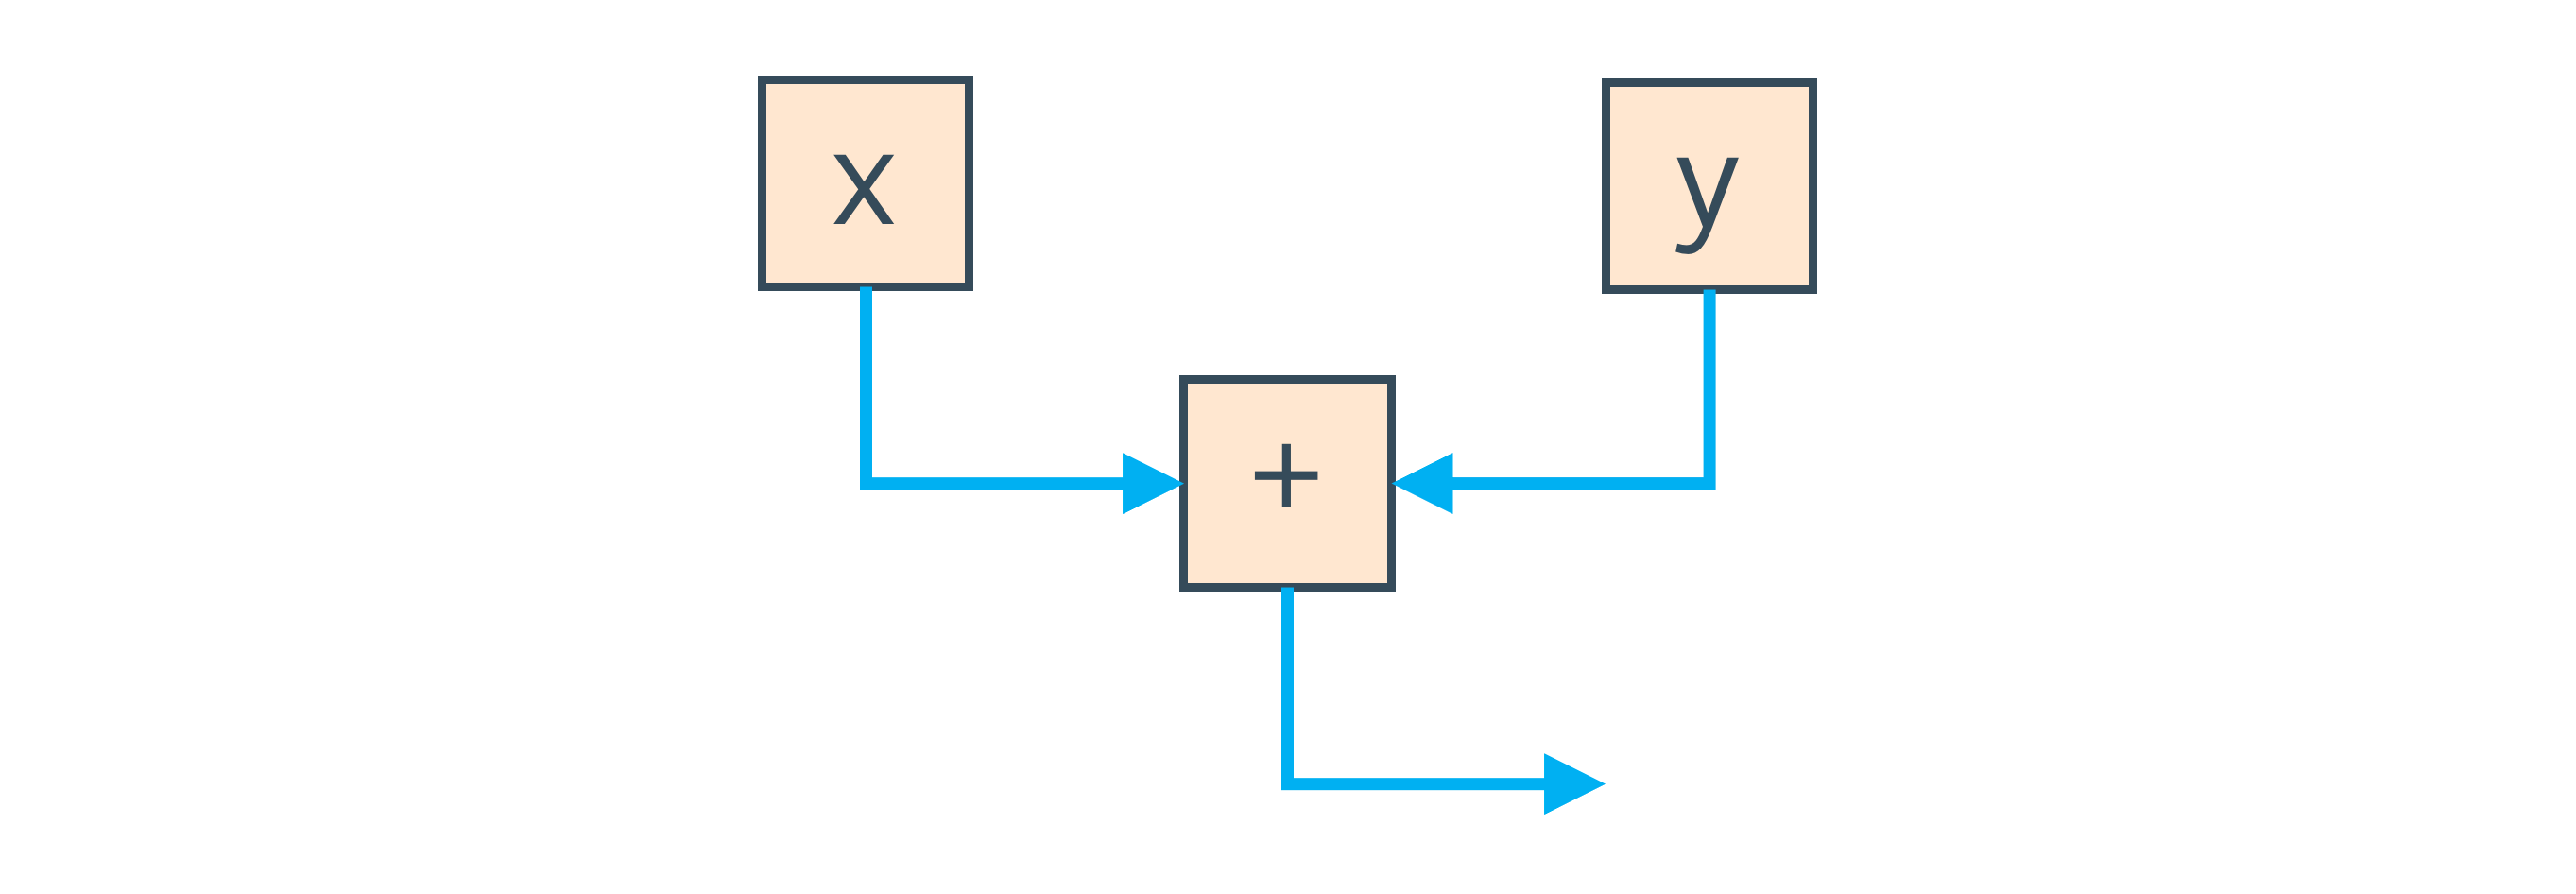
The blue edges in this graph represent how the data flows from reading the local variables, into doing the add.
We can also use edges to represent the order that the program has to run in. If
we call methods instead of reading local variables, getX() + getY(), then we
need to remember which order they were called in and we can’t re-order them
(without knowing what code is inside them). To do this we also have an edge
which says do one call and then do the other, and this is shown in red.
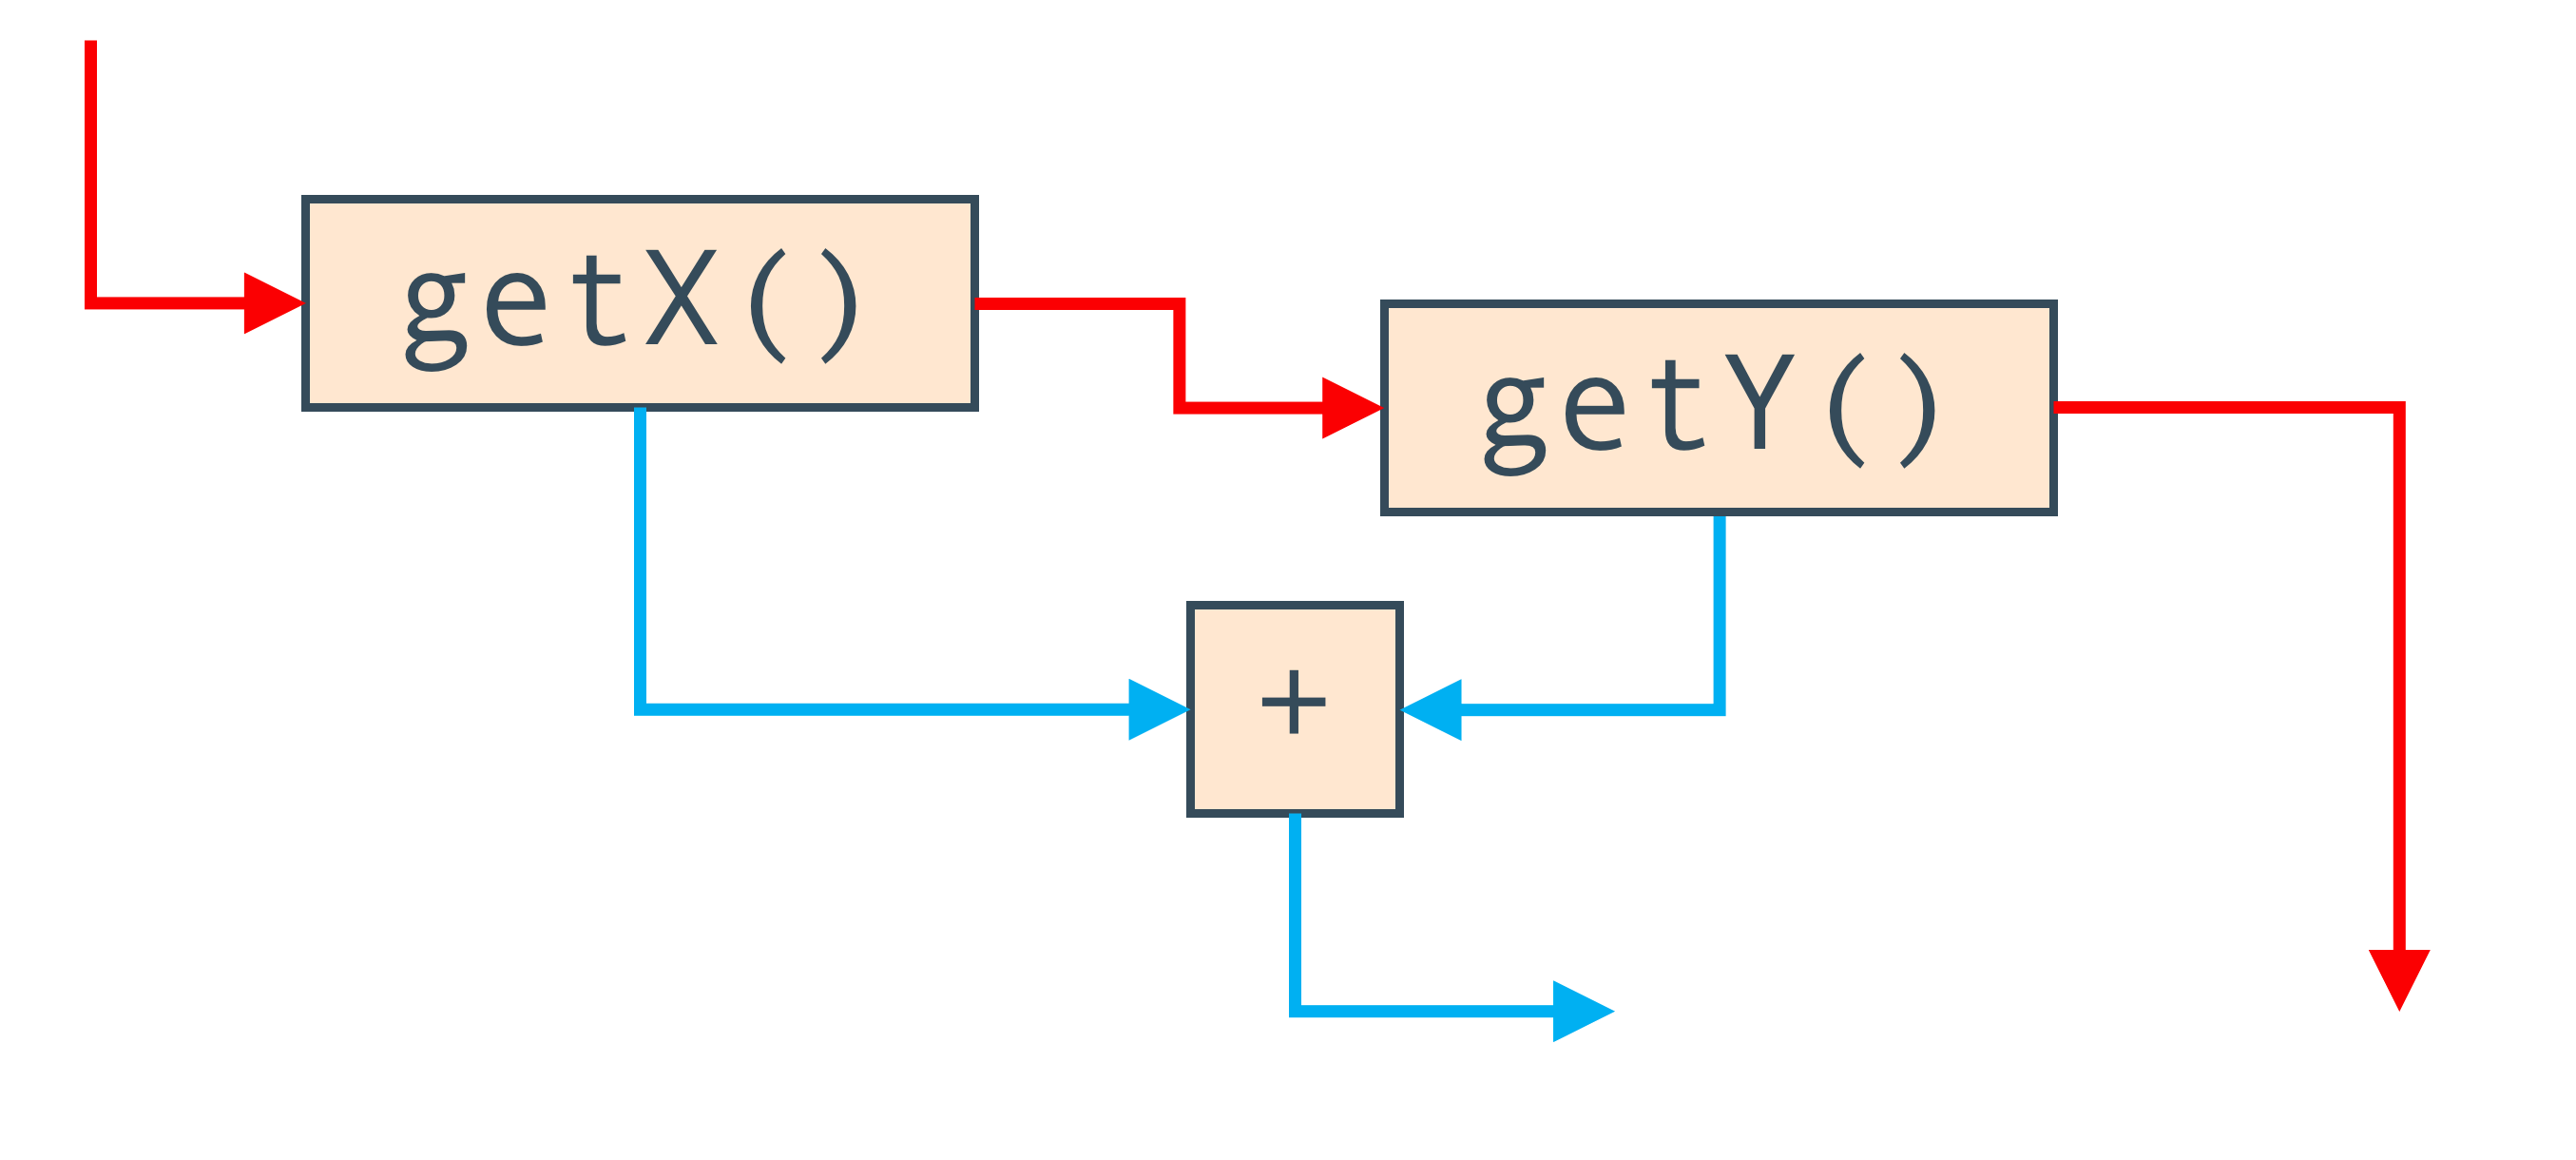
So the Graal graph is in some ways two graphs at once composed on each other. The nodes are the same, but one set of edges says how the data flows through them, and the other says how control moves between them.
You can see real Graal graphs by using a tool called the IdealGraphVisualiser,
or IGV. You can start this by running mx igv.
Then run the JVM with -Dgraal.Dump.
We can see very simple dataflow only by writing a simple expression.
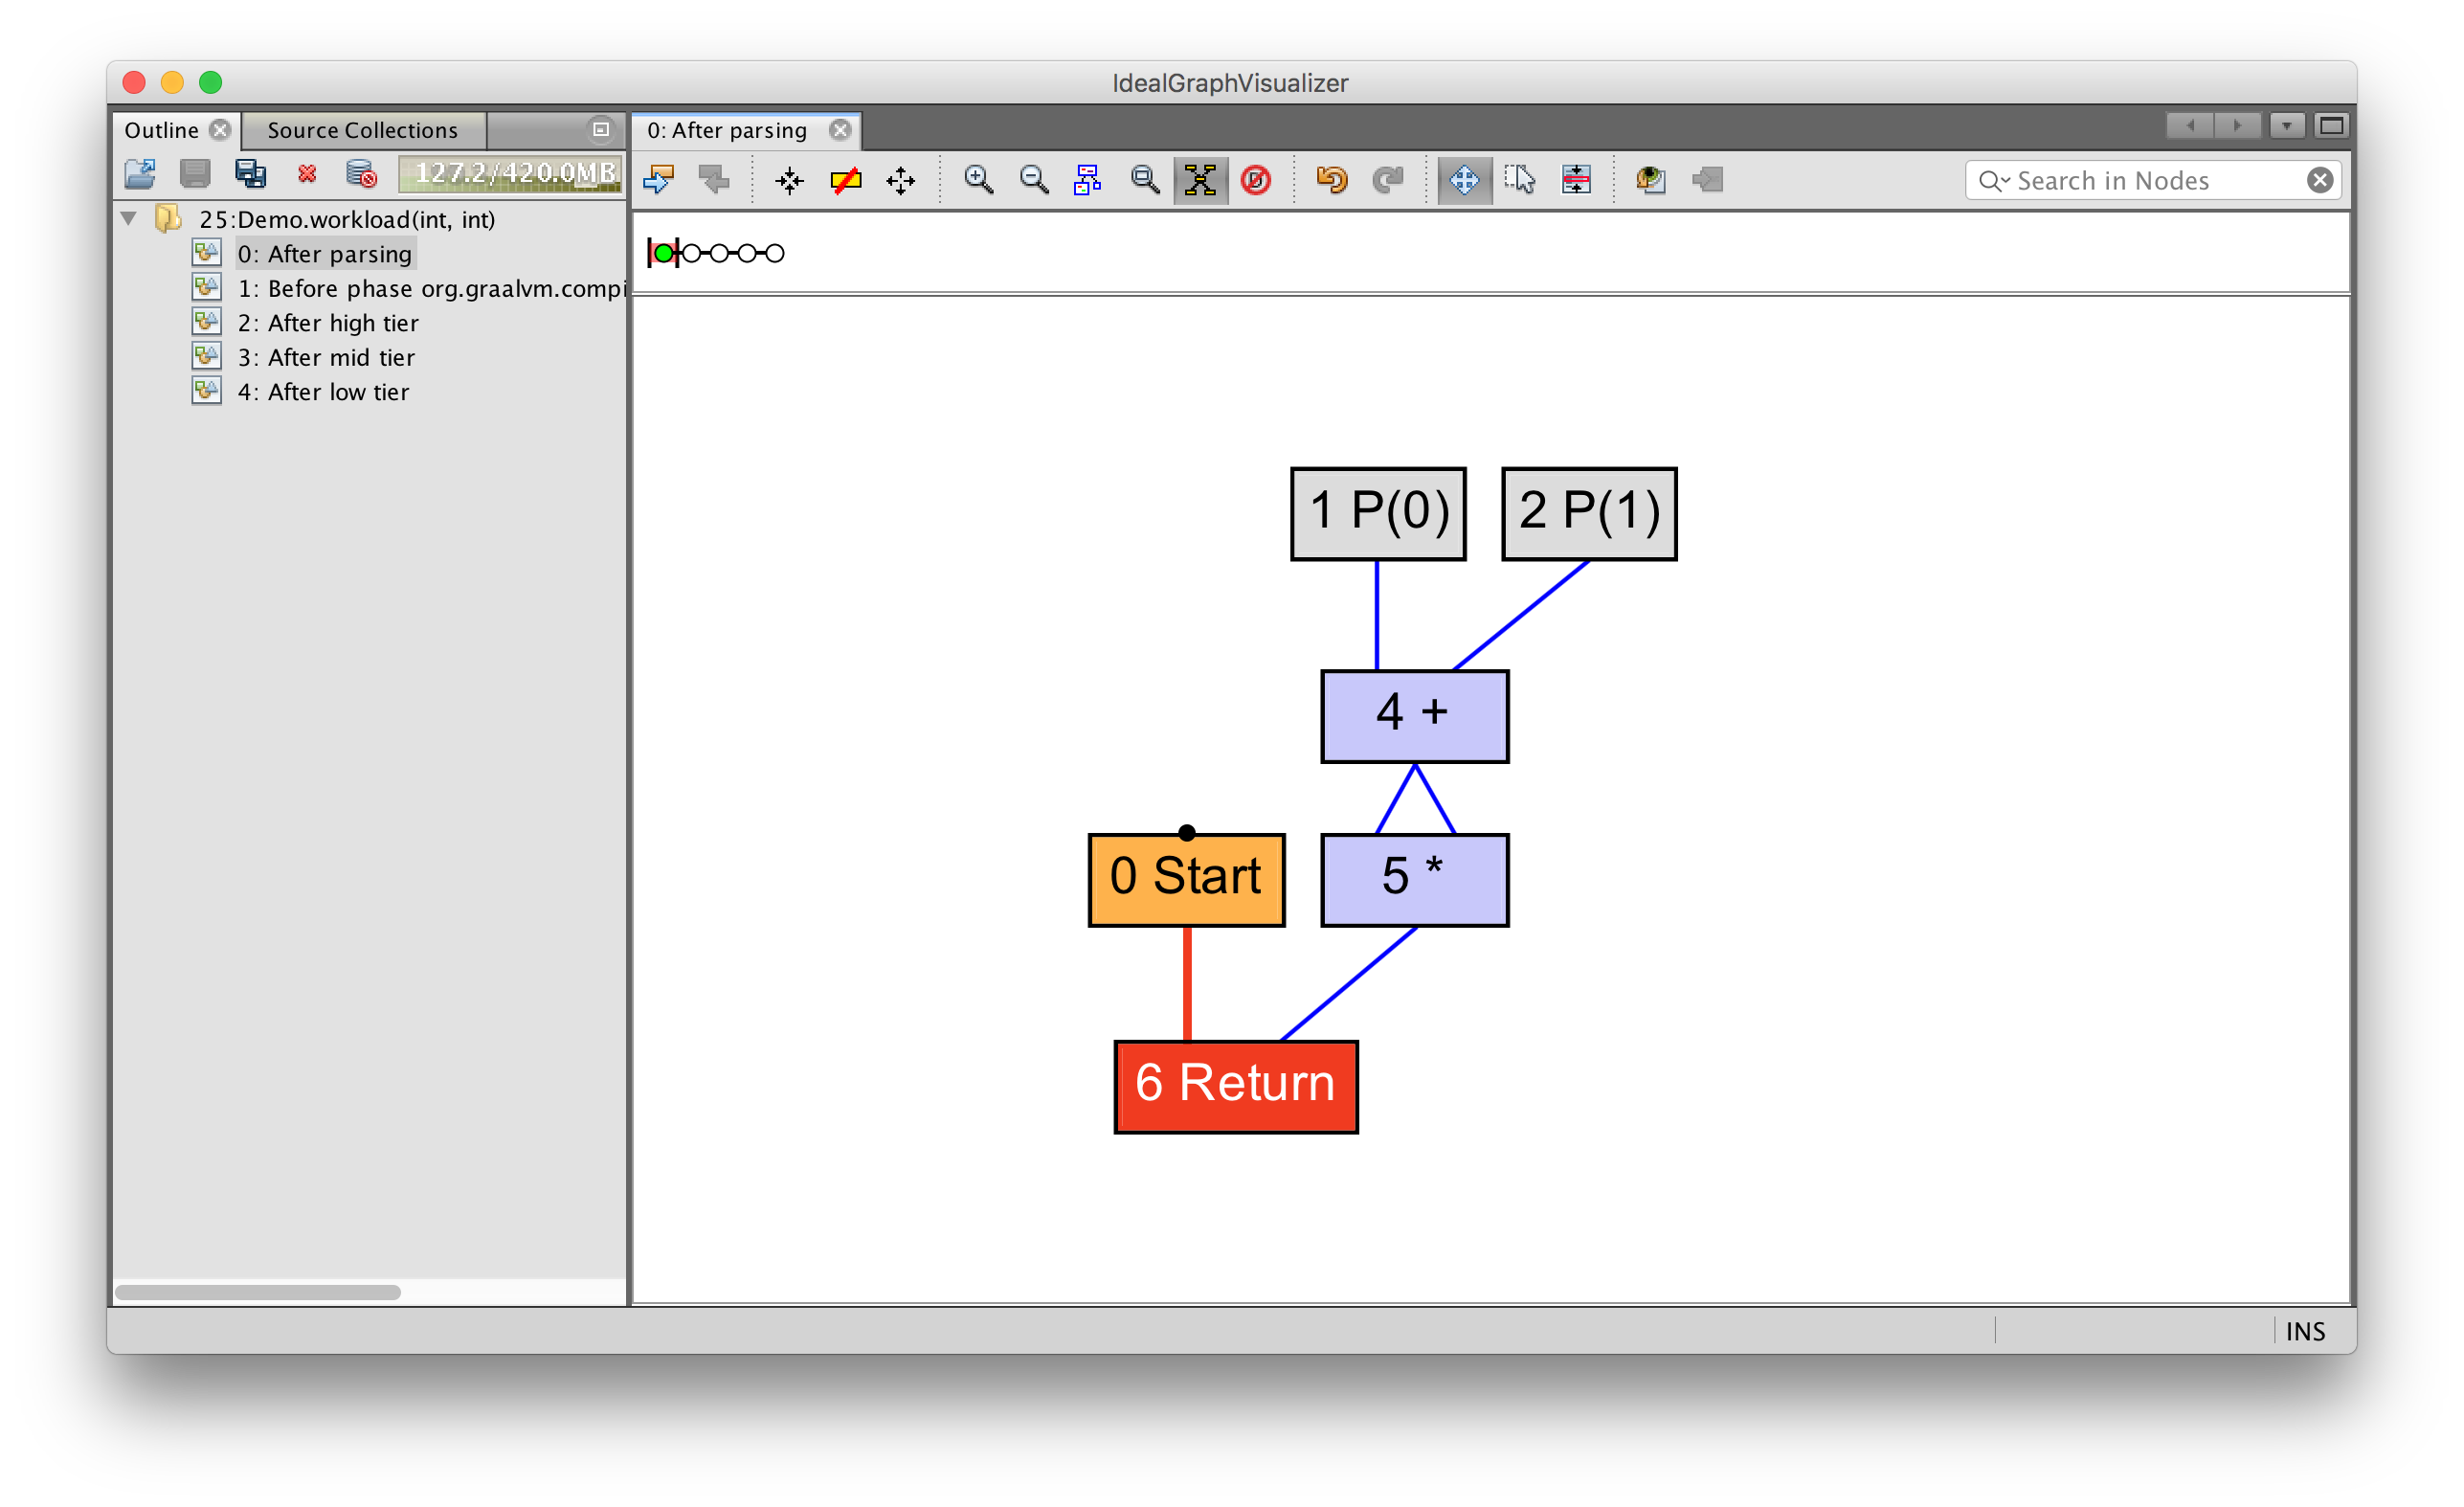
int average(int a, int b) {
  return (a + b) / 2;
}
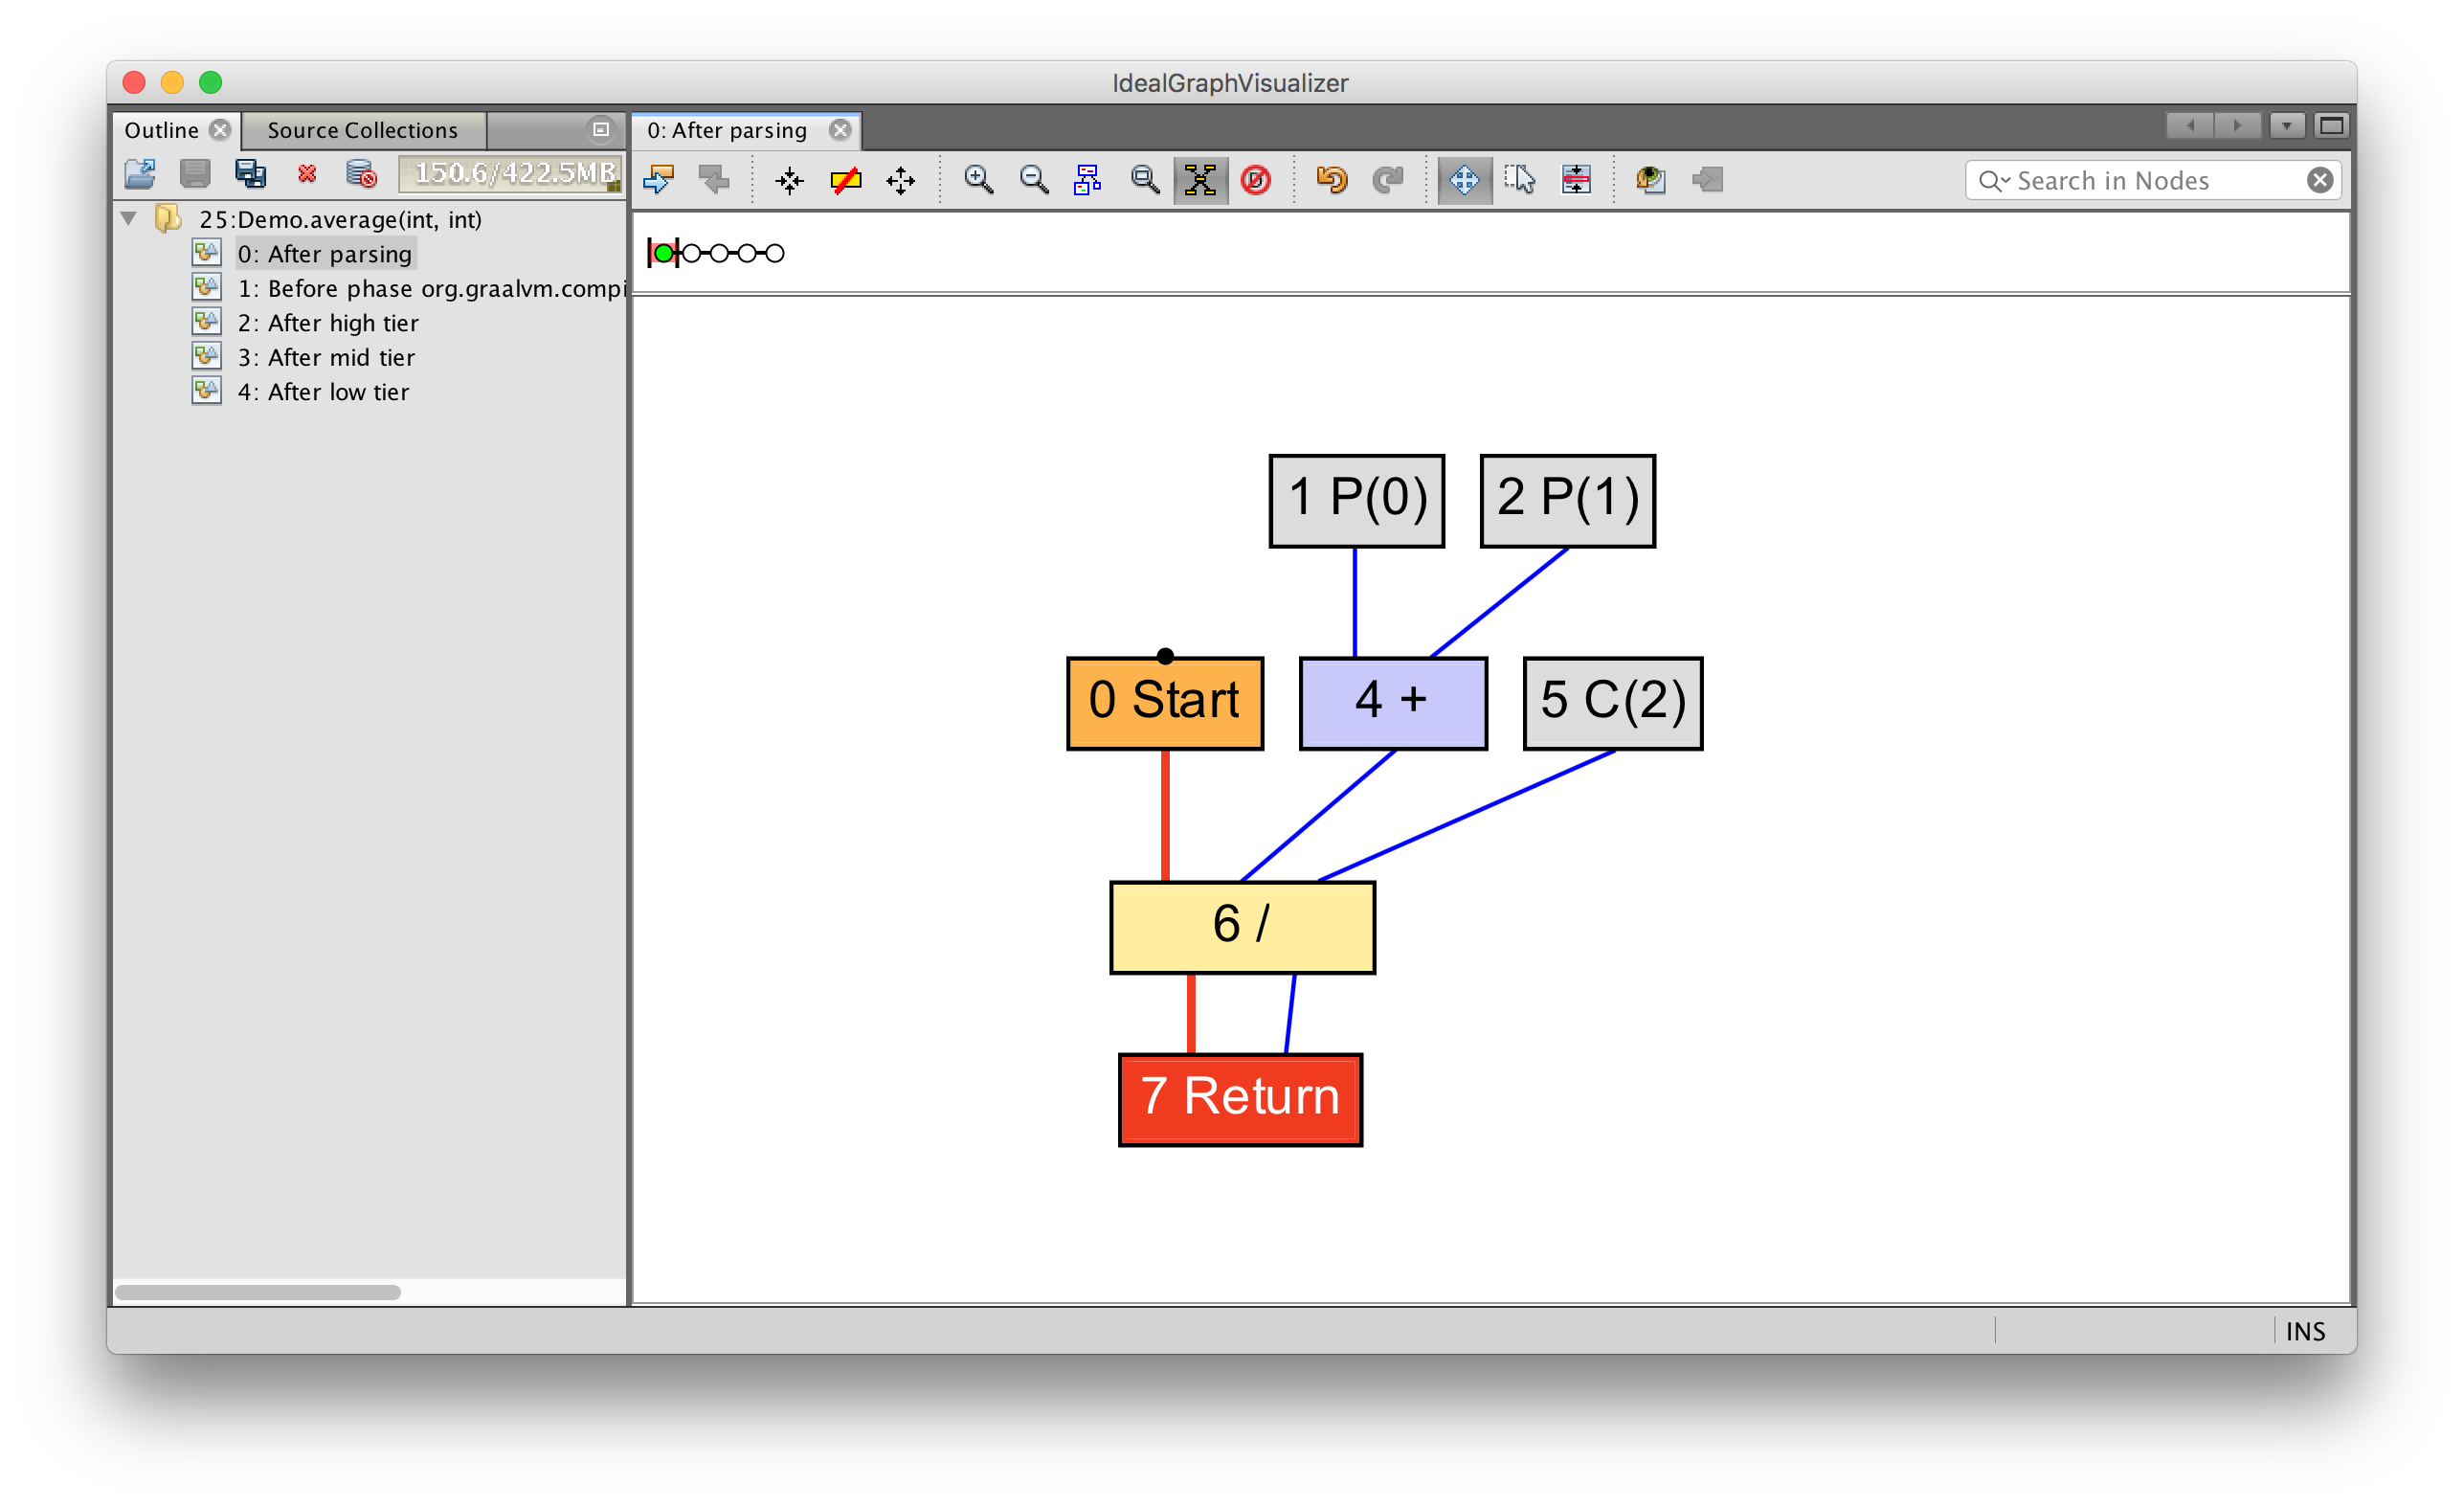
You can see how parameters 0 (written as P(0)) and 1 (written as P(1))
feed into an add operation, which feeds into a divide operation with the
constant value 2 (written as C(2)). This value is then returned.
We can see more complex data and control flow together if we introduce a loop.
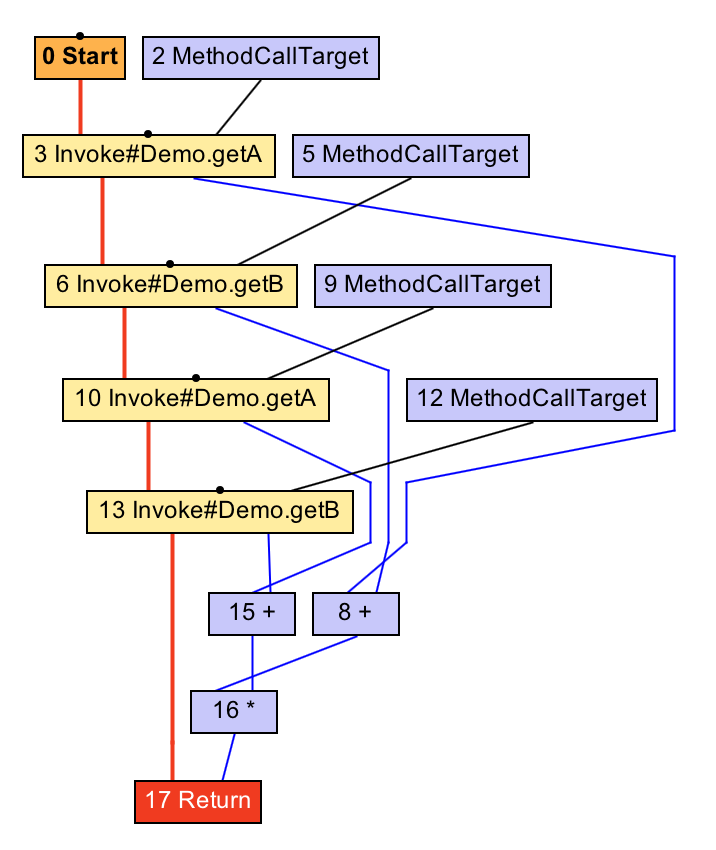
int average(int[] values) {
  int sum = 0;
  for (int n = 0; n < values.length; n++) {
    sum += values[n];
  }
  return sum / values.length;
}
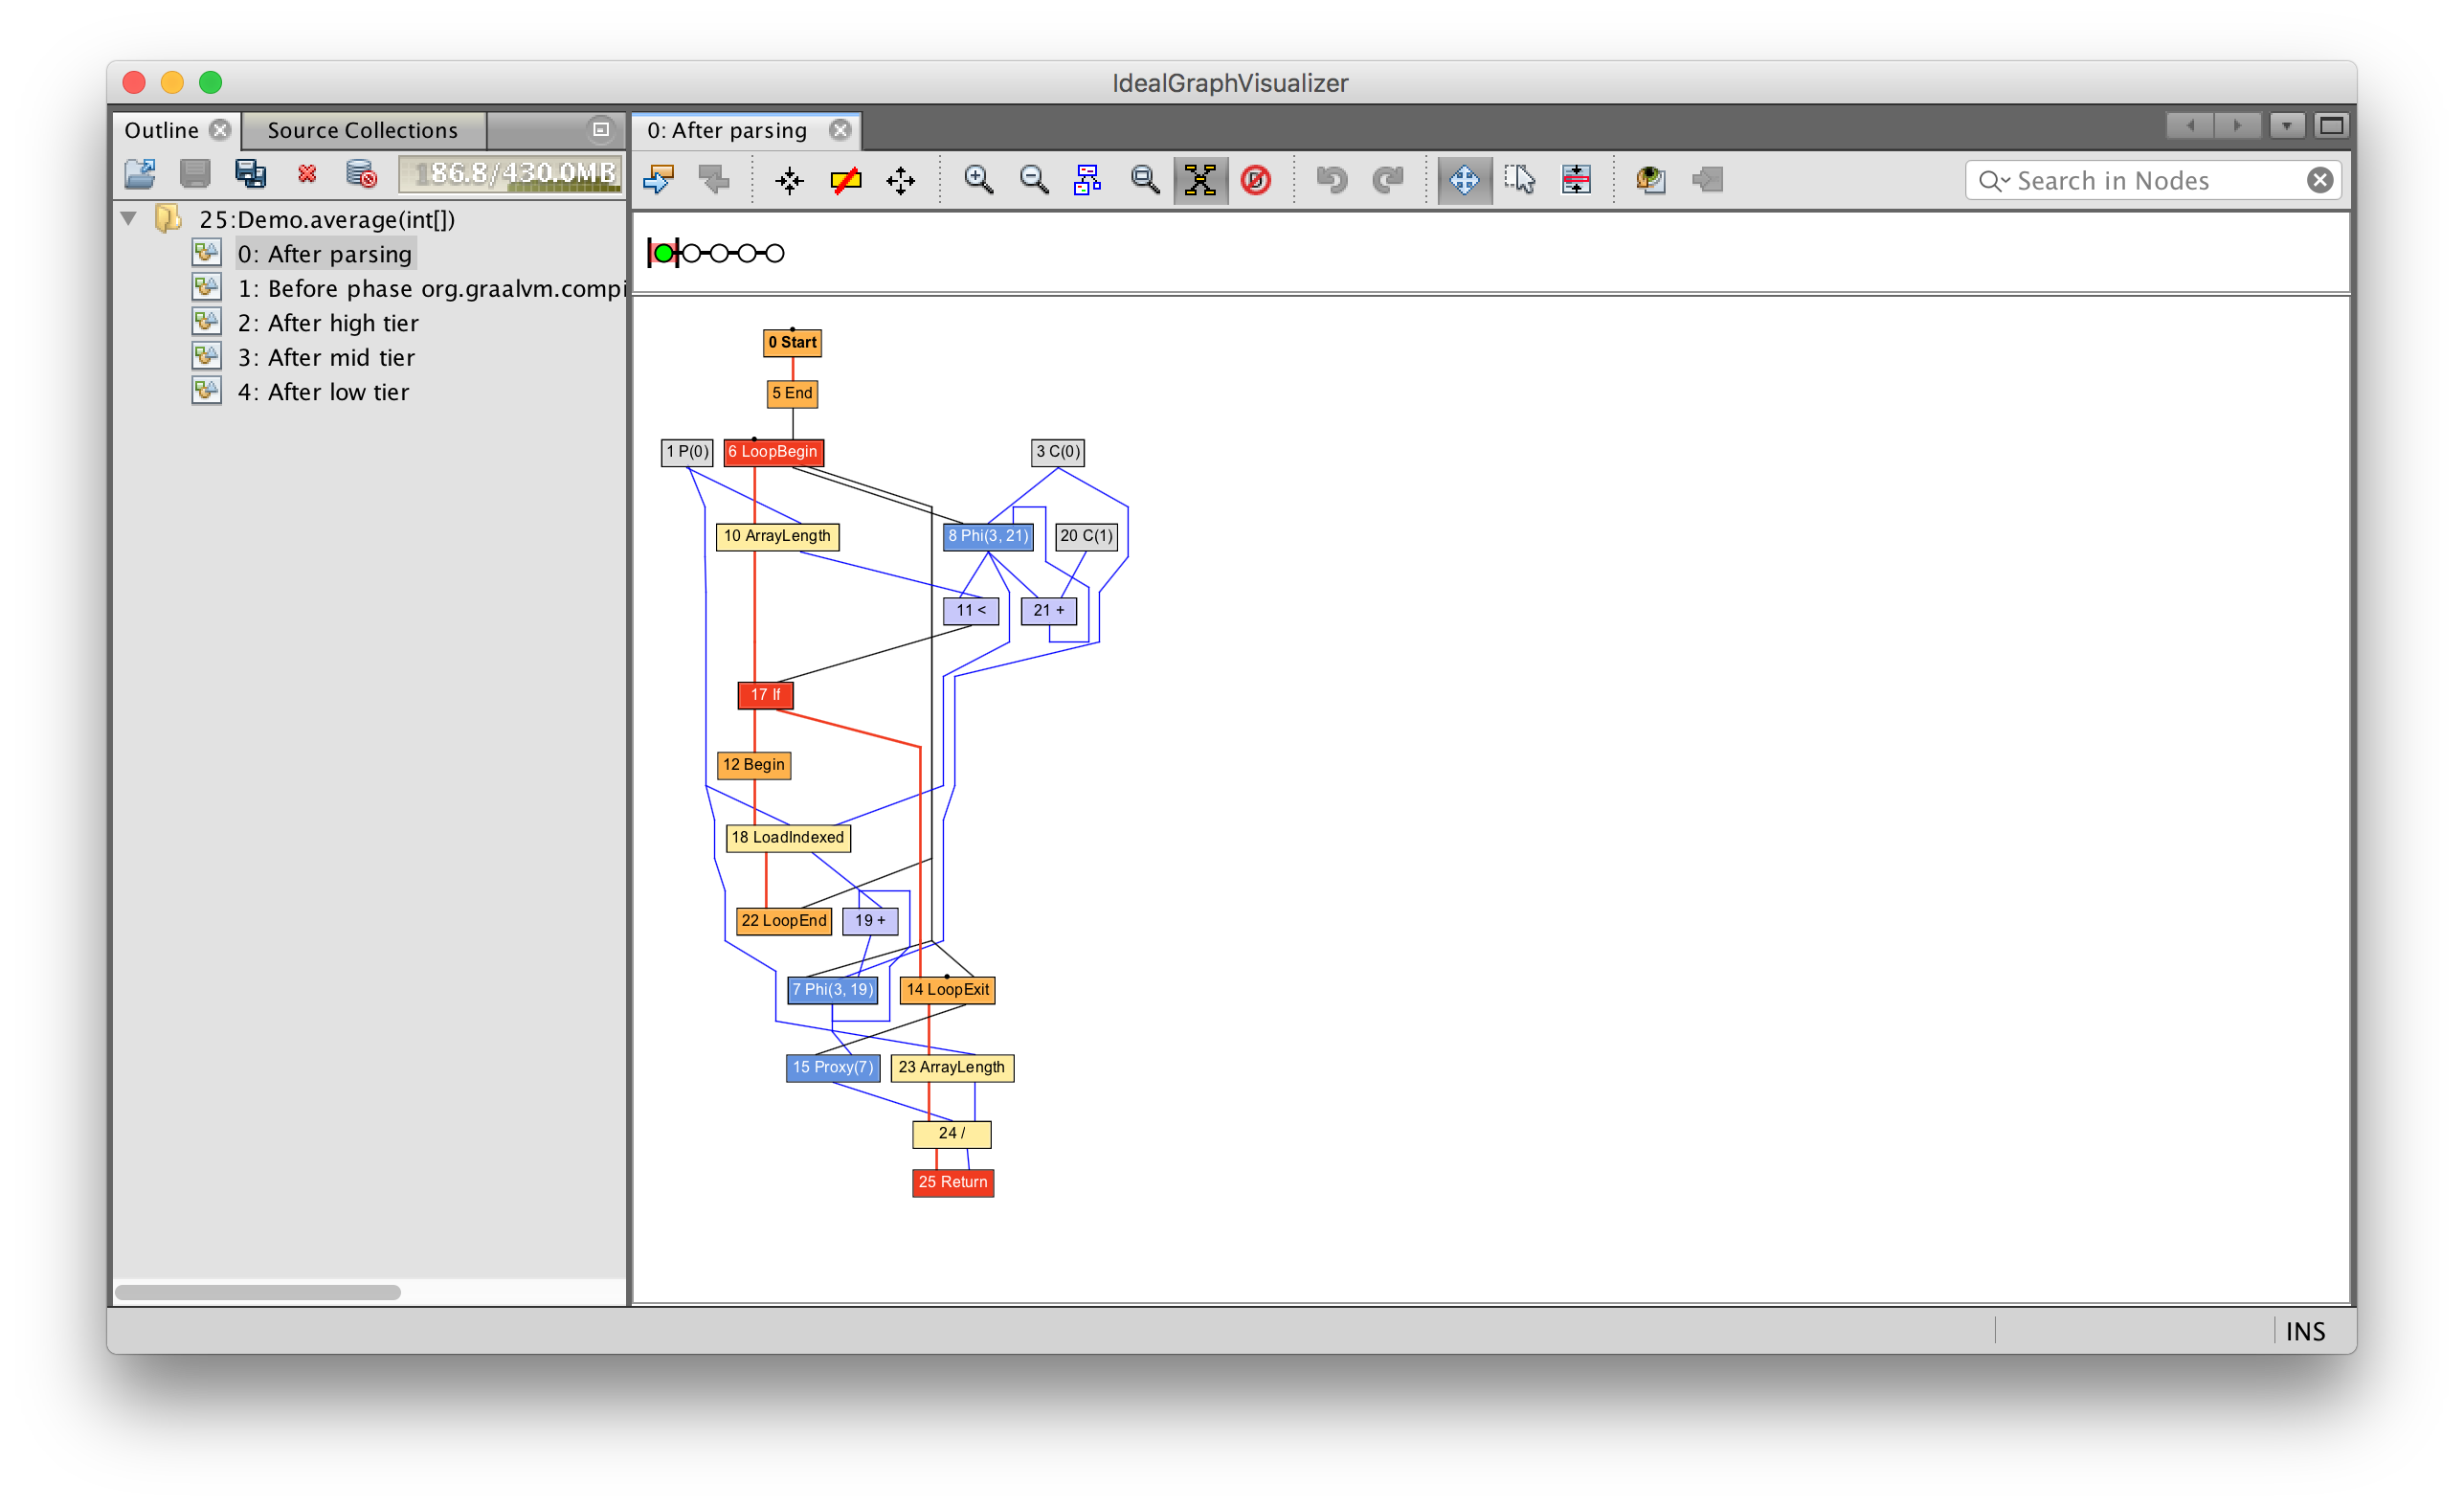
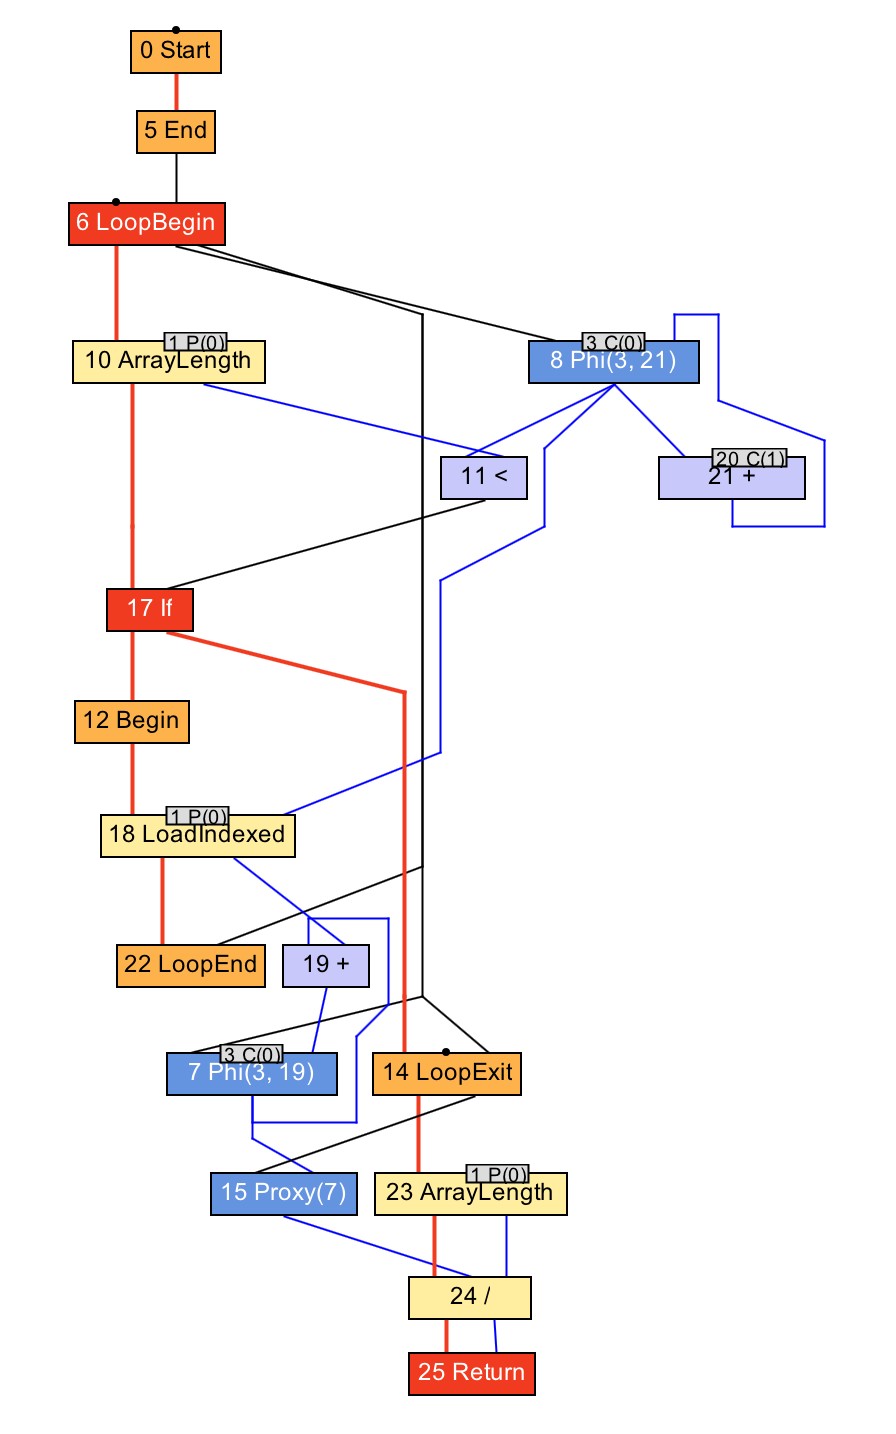
Now we have nodes to begin and end a loop, to read from the array, and to read the array length. As before, the blue lines show how data flows as before, and the red lines show how control moves.
You can start to see why this data structure is sometimes called a sea-of-nodes, or a soup-of-nodes.
I should say that C2 uses a very similar data structure, and it was really C2 that popularised the idea of a sea-of-nodes compiler, so that isn’t the innovation in Graal.
I won’t show the process by which this graph is created until the next section of the talk, but when Graal has your program in this format, it optimises and compiles it by modifying this data structure. And that’s part of why writing JIT compilers in Java works well; Java is an object-orientated language, and a graph is a set of objects with references connecting them as edges.
From bytecode to machine code
Let’s see what these ideas look like in practice, and follow along some of the way through the compilation pipeline.
Bytecode in
Compilation starts with the bytecode. We’ll go back to our tiny addition example.
int workload(int a, int b) {
  return a + b;
}
We’ll show the bytecode that we get in by printing it out as the compiler starts.
class HotSpotGraalCompiler implements JVMCICompiler {
  CompilationRequestResult compileMethod(CompilationRequest request) {
    System.err.println(request.getMethod().getName() + " bytecode: "
      + Arrays.toString(request.getMethod().getCode()));
    ...
  }
}
workload bytecode: [26, 27, 96, -84]
So that’s the input to the compiler - the bytecode.
The bytecode parser and graph builder
This array of bytes is parsed as JVM bytecode into a Graal graph by the graph builder. This is a kind of abstract interpretation. It interprets the Java bytecode, but instead of passing around values it passes around loose ends of edges and connects them up as it goes.
Let’s use the advantages of having Graal written in Java and see how this works using Eclipse’s navigation tools. We know our example has an add node in it, so let’s see where those are created.
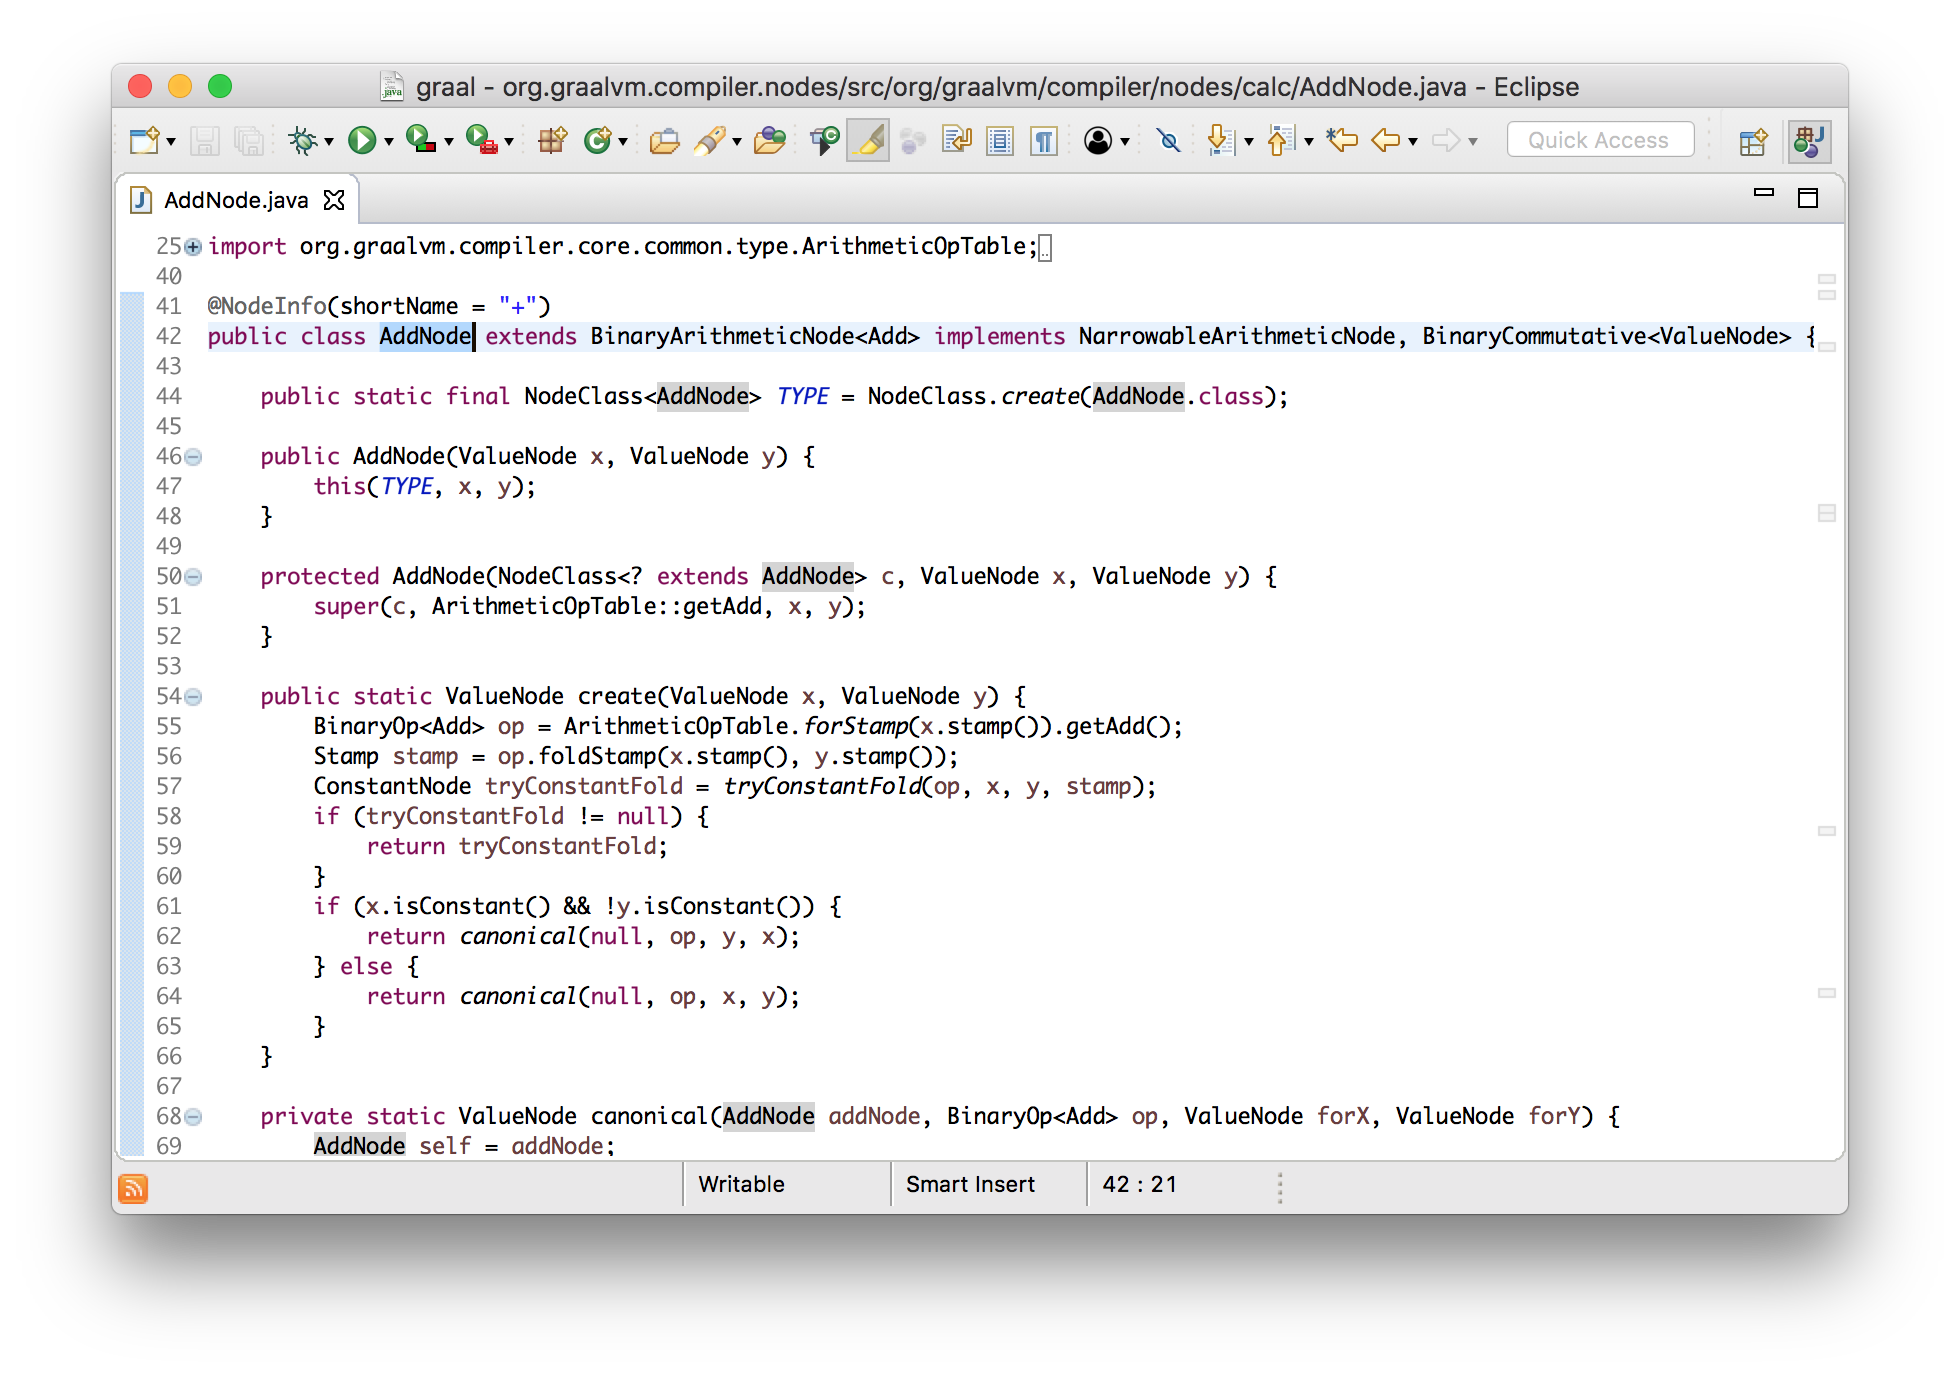
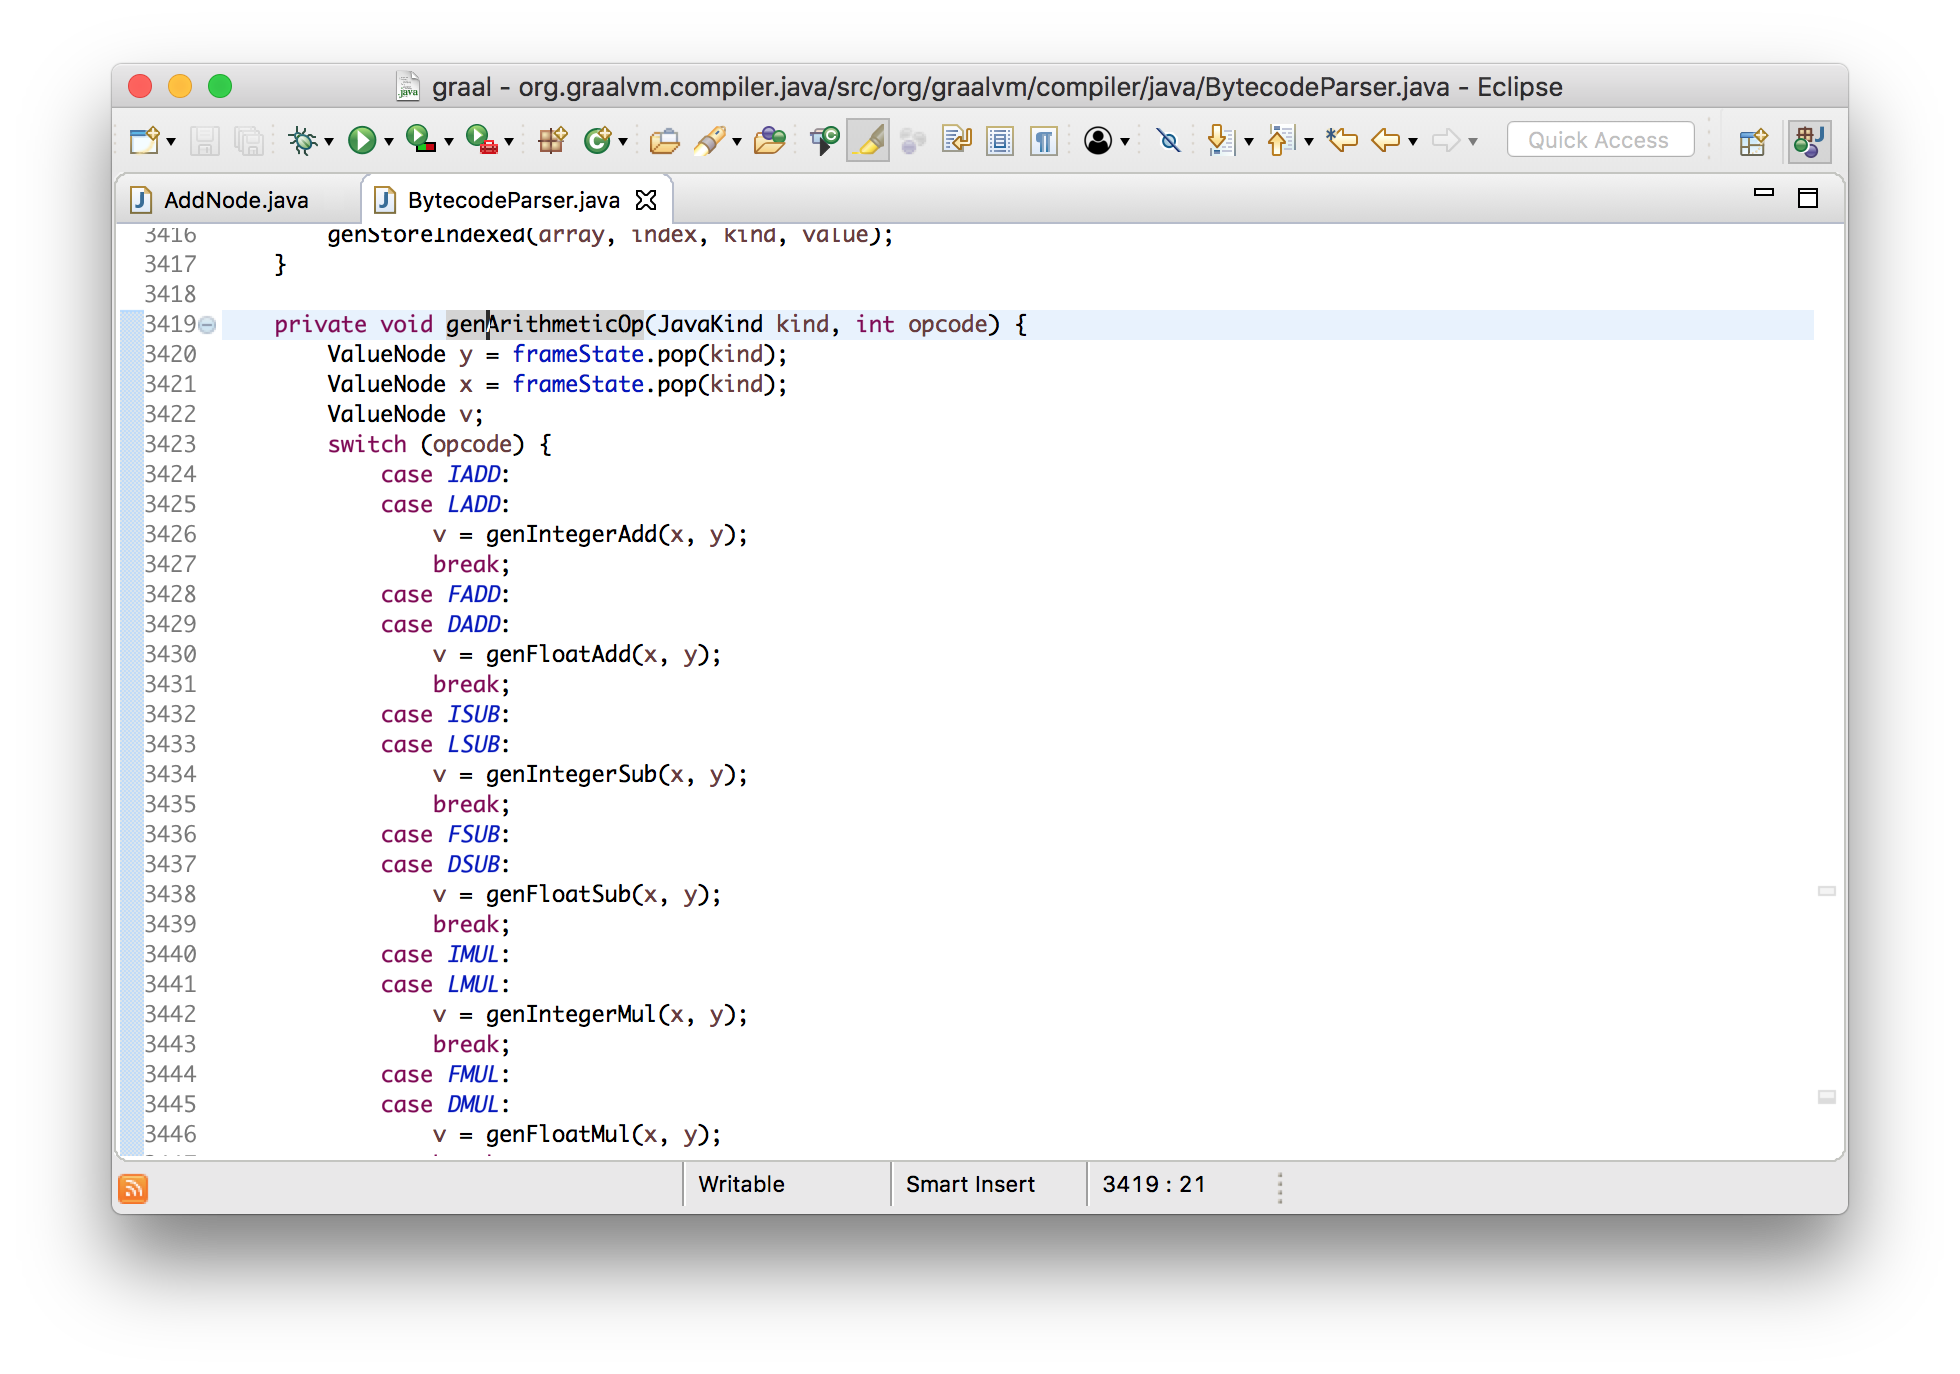
We can see the bytecode parser creating them, and that leads us to the code
where the IADD bytecode is parsed. (By the way, IADD is bytecode 96, which
we saw in the input bytecode we printed.)
private void genArithmeticOp(JavaKind kind, int opcode) {
    ValueNode y = frameState.pop(kind);
    ValueNode x = frameState.pop(kind);
    ValueNode v;
    switch (opcode) {
        ...
        case LADD:
            v = genIntegerAdd(x, y);
            break;
        ...
    }
    frameState.push(kind, append(v));
}
I say that this is abstraction interpretation because this looks a lot like a bytecode interpreter. If this was an actual JVM interpreter, it would be popping two values from the stack, doing an addition, and then pushing the result. Here we pop two nodes from the stack which represent the computation when we actually run the program, add a new node for the addition, and then push that onto the stack representing the result of the addition when it is actually run.
This gives us our Graal graph.
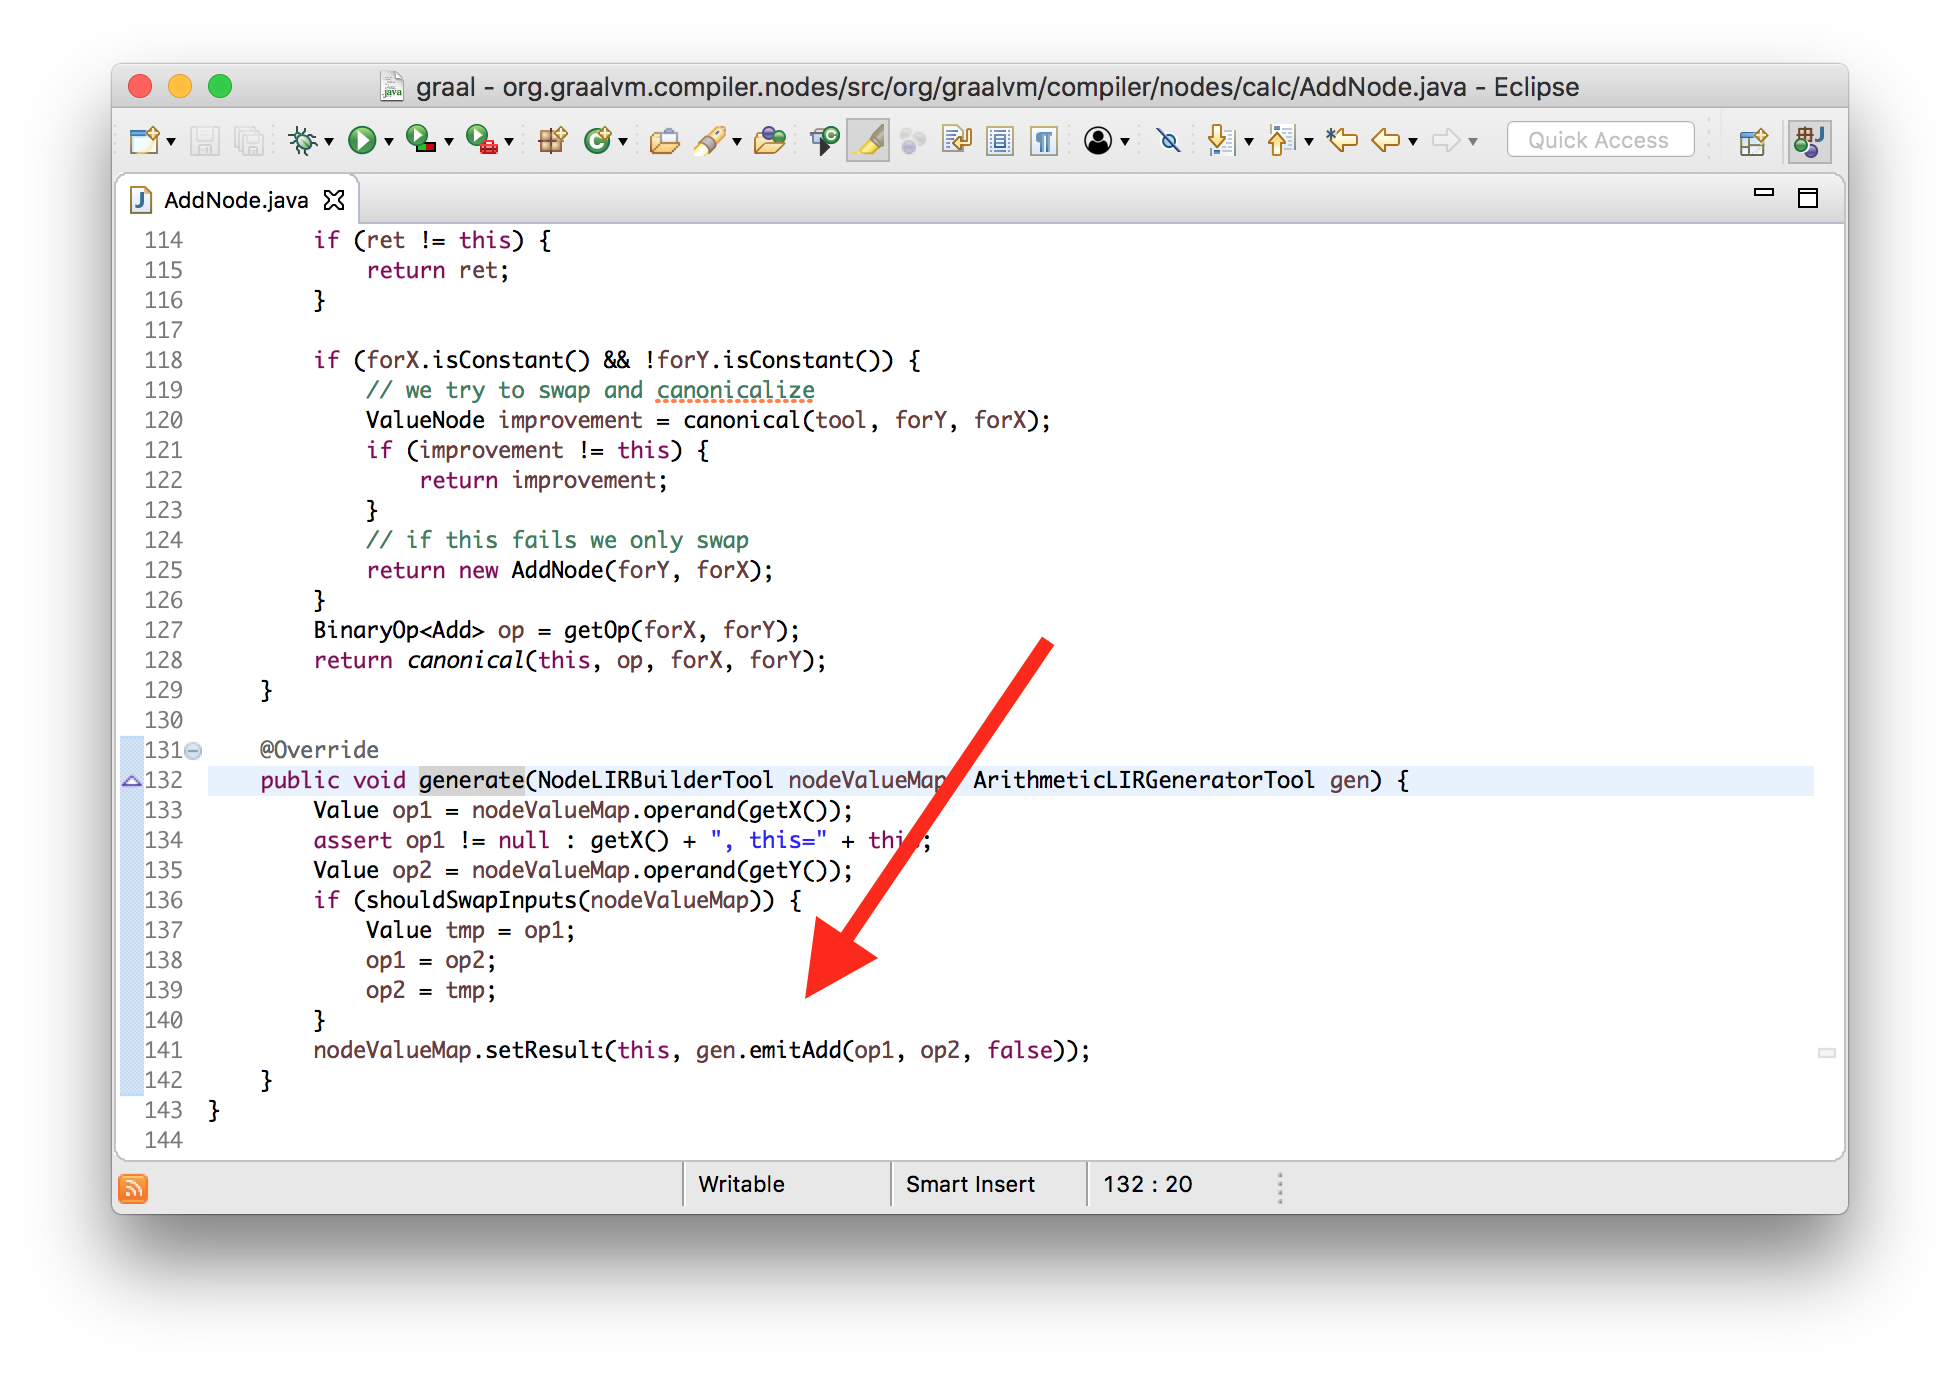
Emitting assembly
When we want to turn the Graal graph into machine code, we need to generate
machine code bytes for each node in the graph. This is done by asking each node
to generate the machine code itself, in a generate method.
void generate(Generator gen) {
    gen.emitAdd(a, b);
}
Again, we’re working at quite a high level of abstraction here. We have a class that lets us emit the machine code instruction without having to know here the details of how that works.
Now, the details of emitAdd are a bit complicated and abstracted because
arithmetic operators have a lot of different combinations of operands to encode
and the different operators can share most of their code, so I will change
our program to do something a little more simple.
int workload(int a) {
  return a + 1;
}
I’ll tell you that this will use an increment instruction, and I’ll show you what that looks like in the assembler.
void incl(Register dst) {
    int encode = prefixAndEncode(dst.encoding);
    emitByte(0xFF);
    emitByte(0xC0 | encode);
}

void emitByte(int b) {
    data.put((byte) (b & 0xFF));
}
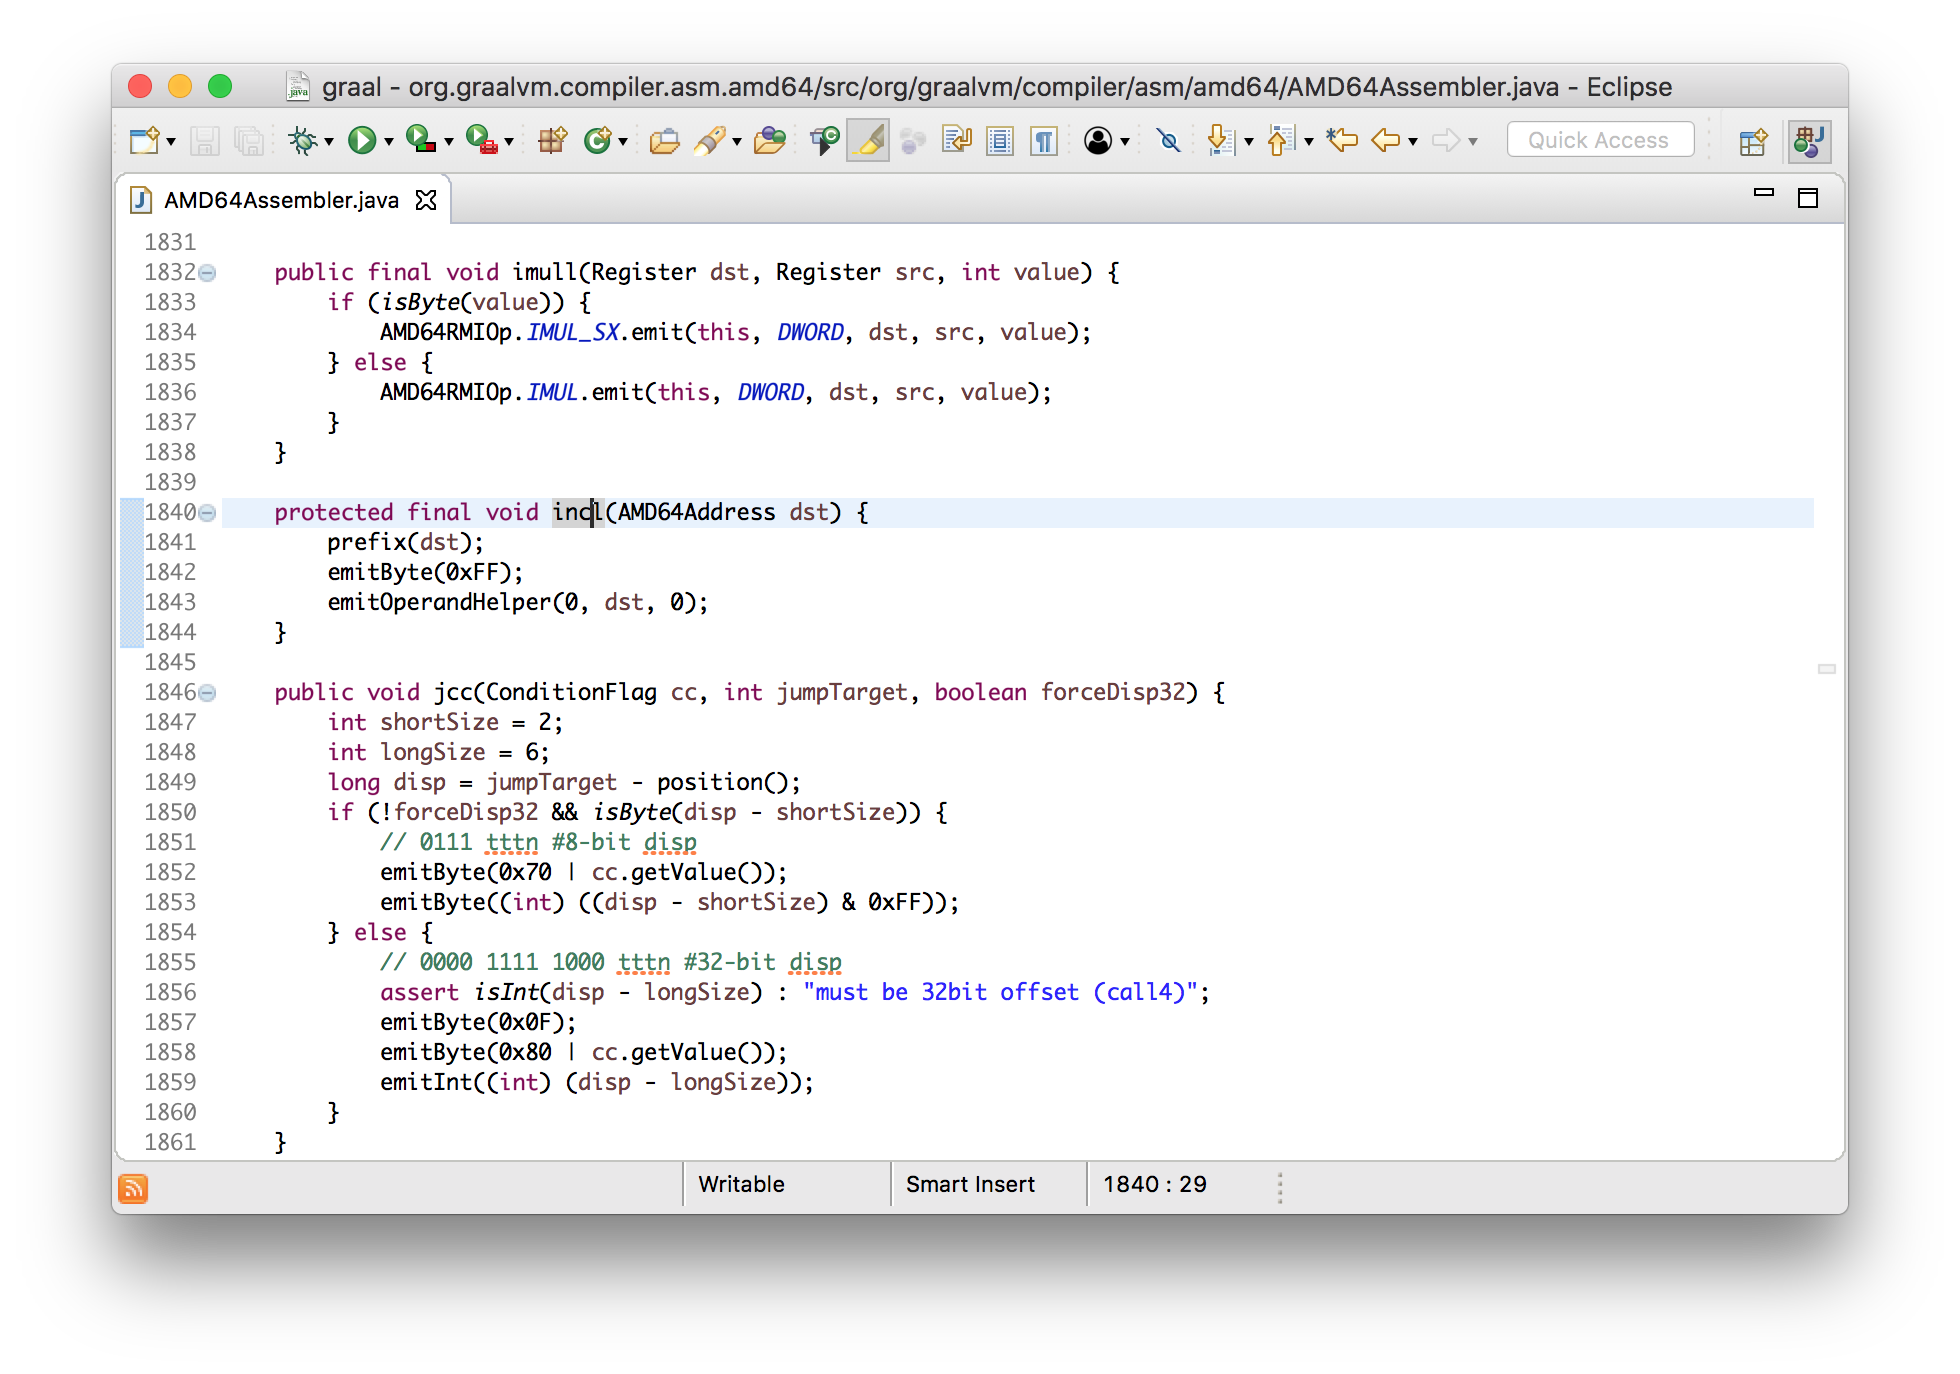
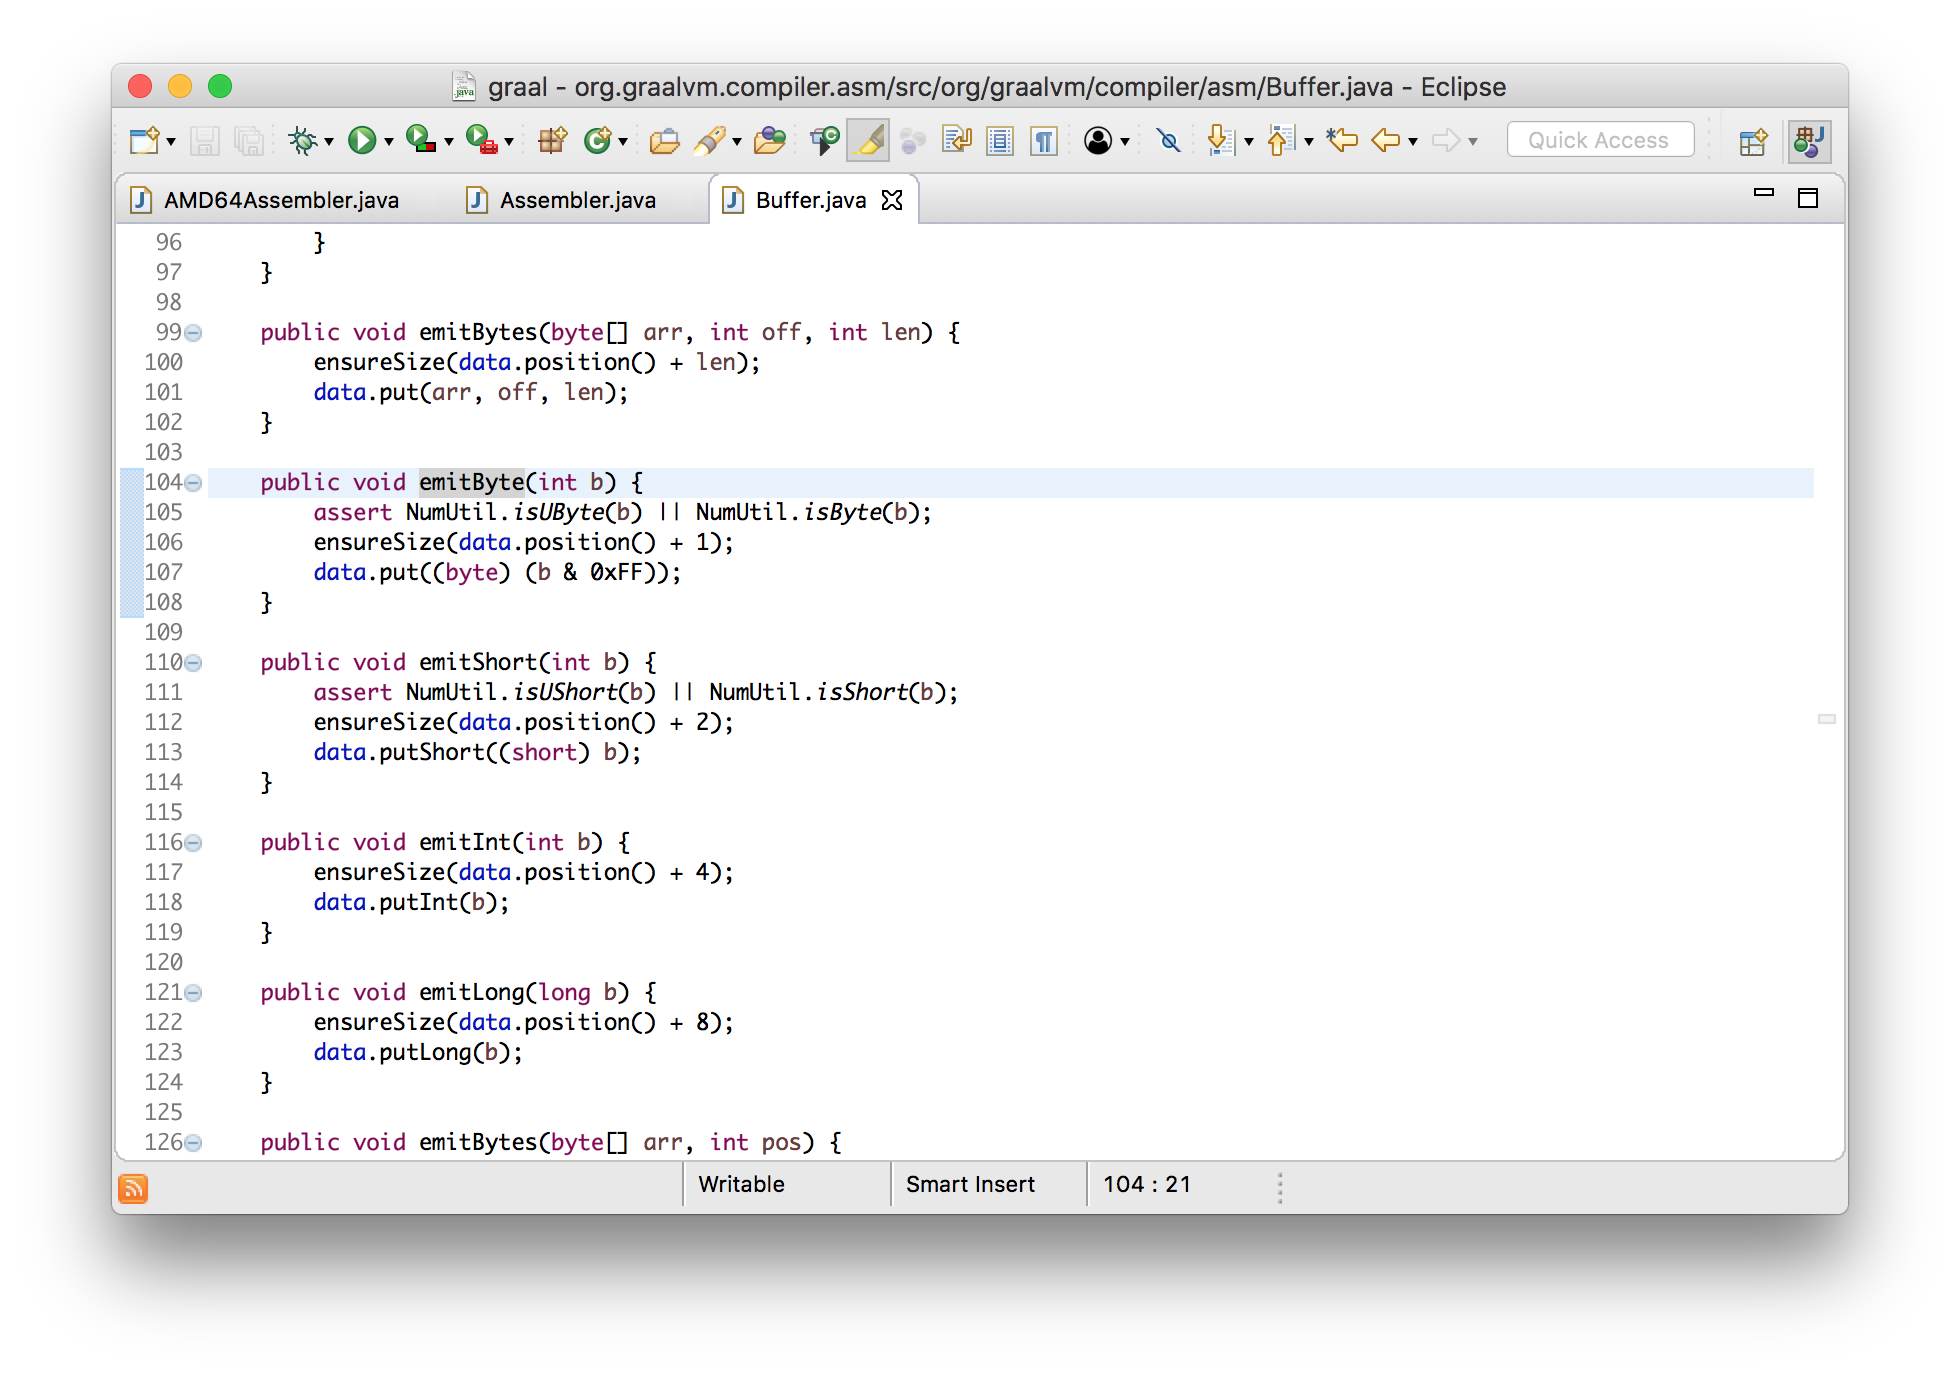
We can see here that it’s emitting bytes to the output, and all this does it add
the byte to a standard ByteBuffer - it’s just building up an array of bytes.
Assembly out
In the same way as we reviewed the bytecode going in, let’s view the machine code coming out. We’ll modify where the machine code is installed to print the bytes.
class HotSpotGraalCompiler implements JVMCICompiler {
  CompilationResult compileHelper(...) {
    ...
    System.err.println(method.getName() + " machine code: "
      + Arrays.toString(result.getTargetCode()));
    ...
  }
}

I’ll also use a tool that disassembles machine code as it’s installed. This is standard for HotSpot - it’s not a Graal thing. I’ll show you how to build the tool - it lives in the OpenJDK repository but it isn’t included in the JVM by default so we have to built it ourselves.
$ cd openjdk/hotspot/src/share/tools/hsdis
$ curl -O https://ftp.gnu.org/gnu/binutils/binutils-2.24.tar.gz
$ tar -xzf binutils-2.24.tar.gz
$ make BINUTILS=binutils-2.24 ARCH=amd64 CFLAGS=-Wno-error
$ cp build/macosx-amd64/hsdis-amd64.dylib ../../../../../..
Now I’m going to add two new options, -XX:+UnlockDiagnosticVMOptions and
-XX:+PrintAssembly.
$ java \
  --module-path=graal/sdk/mxbuild/modules/org.graalvm.graal_sdk.jar:graal/truffle/mxbuild/modules/com.oracle.truffle.truffle_api.jar \
  --upgrade-module-path=graal/compiler/mxbuild/modules/jdk.internal.vm.compiler.jar \
  -XX:+UnlockExperimentalVMOptions \
  -XX:+EnableJVMCI \
  -XX:+UseJVMCICompiler \
  -XX:-TieredCompilation \
  -XX:+PrintCompilation \
  -XX:+UnlockDiagnosticVMOptions \
  -XX:+PrintAssembly \
  -XX:CompileOnly=Demo::workload \
  Demo
Now we can run our example and see our add instruction being emitted.
workload machine code: [15, 31, 68, 0, 0, 3, -14, -117, -58, -123, 5, ...]
...
0x000000010f71cda0: nopl   0x0(%rax,%rax,1)
0x000000010f71cda5: add    %edx,%esi          ;*iadd {reexecute=0 rethrow=0 return_oop=0}
                                              ; - Demo::workload@2 (line 10)

0x000000010f71cda7: mov    %esi,%eax          ;*ireturn {reexecute=0 rethrow=0 return_oop=0}
                                              ; - Demo::workload@3 (line 10)

0x000000010f71cda9: test   %eax,-0xcba8da9(%rip)        # 0x0000000102b74006
                                              ;   {poll_return}
0x000000010f71cdaf: vzeroupper
0x000000010f71cdb2: retq
Ok, let’s verify that we really are controlling all of this. Let’s change the
implementation of addition to make it actually subtraction instead. I’m going to
edit the generate method of the addition node to emit a subtraction
instruction instead of an addition instruction.
class AddNode {
  void generate(...) {
    ... gen.emitSub(op1, op2, false) ...  // changed from emitAdd
  }
}
If we run this we can see both the machine code bytes change and the see the new instruction.
workload mechine code: [15, 31, 68, 0, 0, 43, -14, -117, -58, -123, 5, ...]
0x0000000107f451a0: nopl   0x0(%rax,%rax,1)
0x0000000107f451a5: sub    %edx,%esi          ;*iadd {reexecute=0 rethrow=0 return_oop=0}
                                              ; - Demo::workload@2 (line 10)

0x0000000107f451a7: mov    %esi,%eax          ;*ireturn {reexecute=0 rethrow=0 return_oop=0}
                                              ; - Demo::workload@3 (line 10)

0x0000000107f451a9: test   %eax,-0x1db81a9(%rip)        # 0x000000010618d006
                                              ;   {poll_return}
0x0000000107f451af: vzeroupper
0x0000000107f451b2: retq
So what have we learned here? Graal really does take in a simple byte array of bytecode, we can see how the graph nodes are created from that, we can see how the nodes emit instructions, and how the instructions are encoded. We saw that we could change how Graal worked.
[26, 27, 96, -84] → [15, 31, 68, 0, 0, 43, -14, -117, -58, -123, 5, ...]
Optimisations
Ok, we’ve shown how we get the graph, and how the nodes in the graph are output as machine code. Let’s talk now about how Graal optimises the graph to make it more efficient.
An optimisation phase is just a method that has the opportunity to modify the graph. You write phases by implementing an interface.
interface Phase {
  void run(Graph graph);
}
Canonicalisation
Canonicalisation means rearranging nodes into a uniform representation. This has some other purposes as well, but for the purposes of this presentation I’ll say that it really means constant folding and simplifying the nodes.
Nodes are responsible for simplifying themselves - they have a method
canonical.
interface Node {
  Node canonical();
}
Let’s look at something like the negate node, which is the unary subtraction
operator. The negate node will remove itself and its child if it’s being applied
to another negate node, leaving just the value behind. It simplifies --x to
just x.
class NegateNode implements Node {
  Node canonical() {
    if (value instanceof NegateNode) {
      return ((NegateNode) value).getValue();
    } else {
      return this;
    }
  }
}

This is a really great example of how understandable Graal is. The logic here is almost as simple as it could be.
If you have a clever idea for how to simplify a Java operation, you can modify
the canonical method to do it.
Global value numbering
Global value numbering is a technique to remove code that is redundant because
it appears more than once. In this example, a + b could be calculated just
once and the value then used twice.
int workload(int a, int b) {
  return (a + b) * (a + b);
}
Graal can compare nodes to see if they’re equal. It’s simple - they’re equal if they have the same inputs. Graal’s global value numbering phase looks to see if each node is equal to any other and replaces them with a single copy if they are. It does this efficiently by putting all the nodes into a hash map. It’s a bit like a cache of nodes.
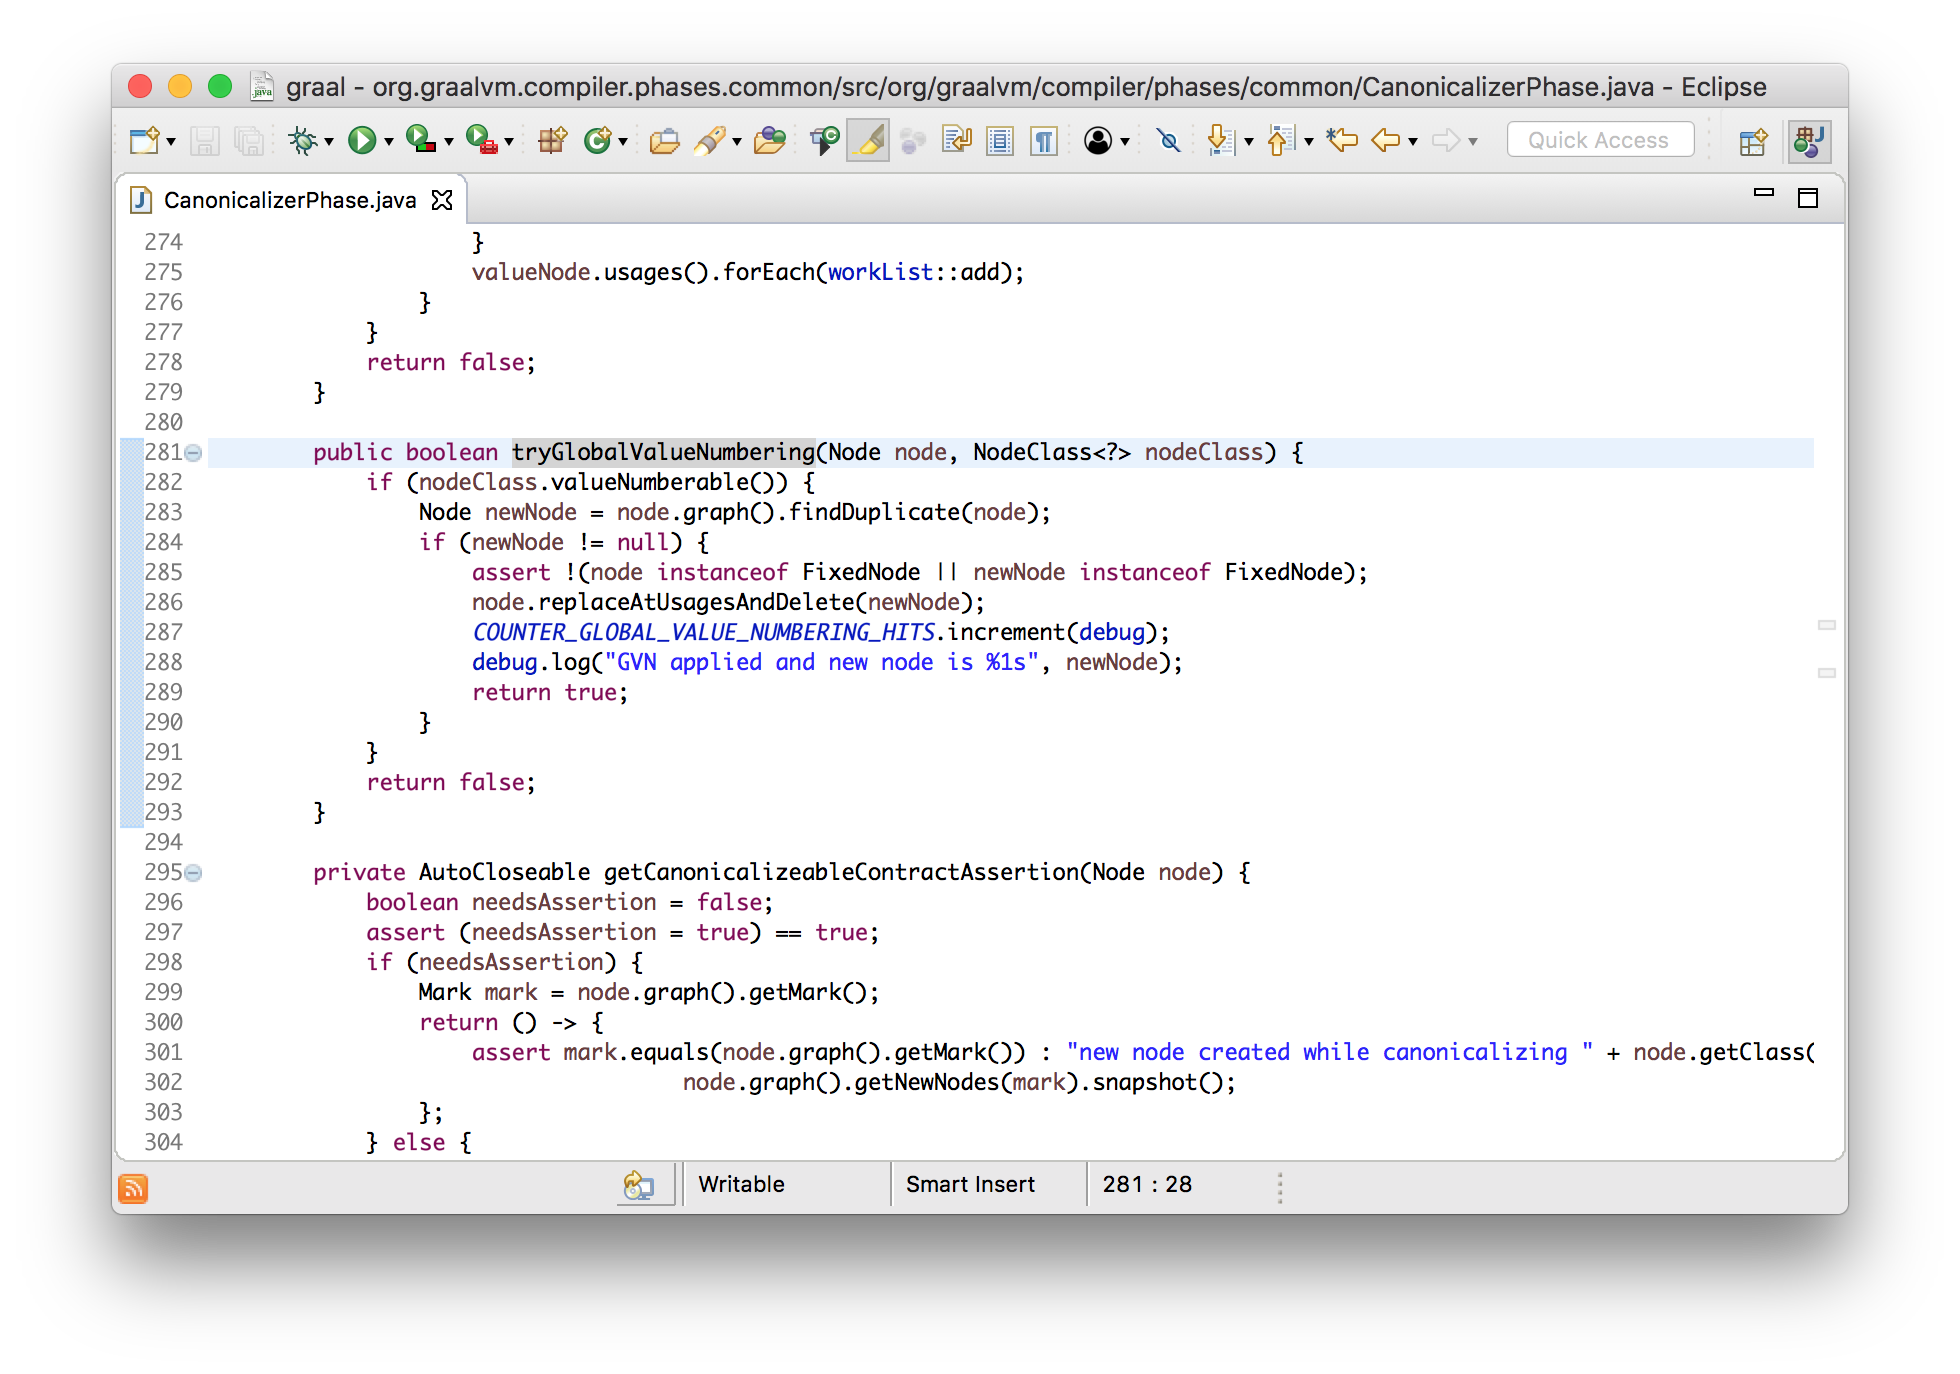
Note that test that the node isn’t fixed - this means that the node doesn’t possibly have a side effect so has to happen at a certain point of time. If we use a method call instead then the terms become fixed and not redundant so they aren’t merged into one.
int workload() {
  return (getA() + getB()) * (getA() + getB());
}
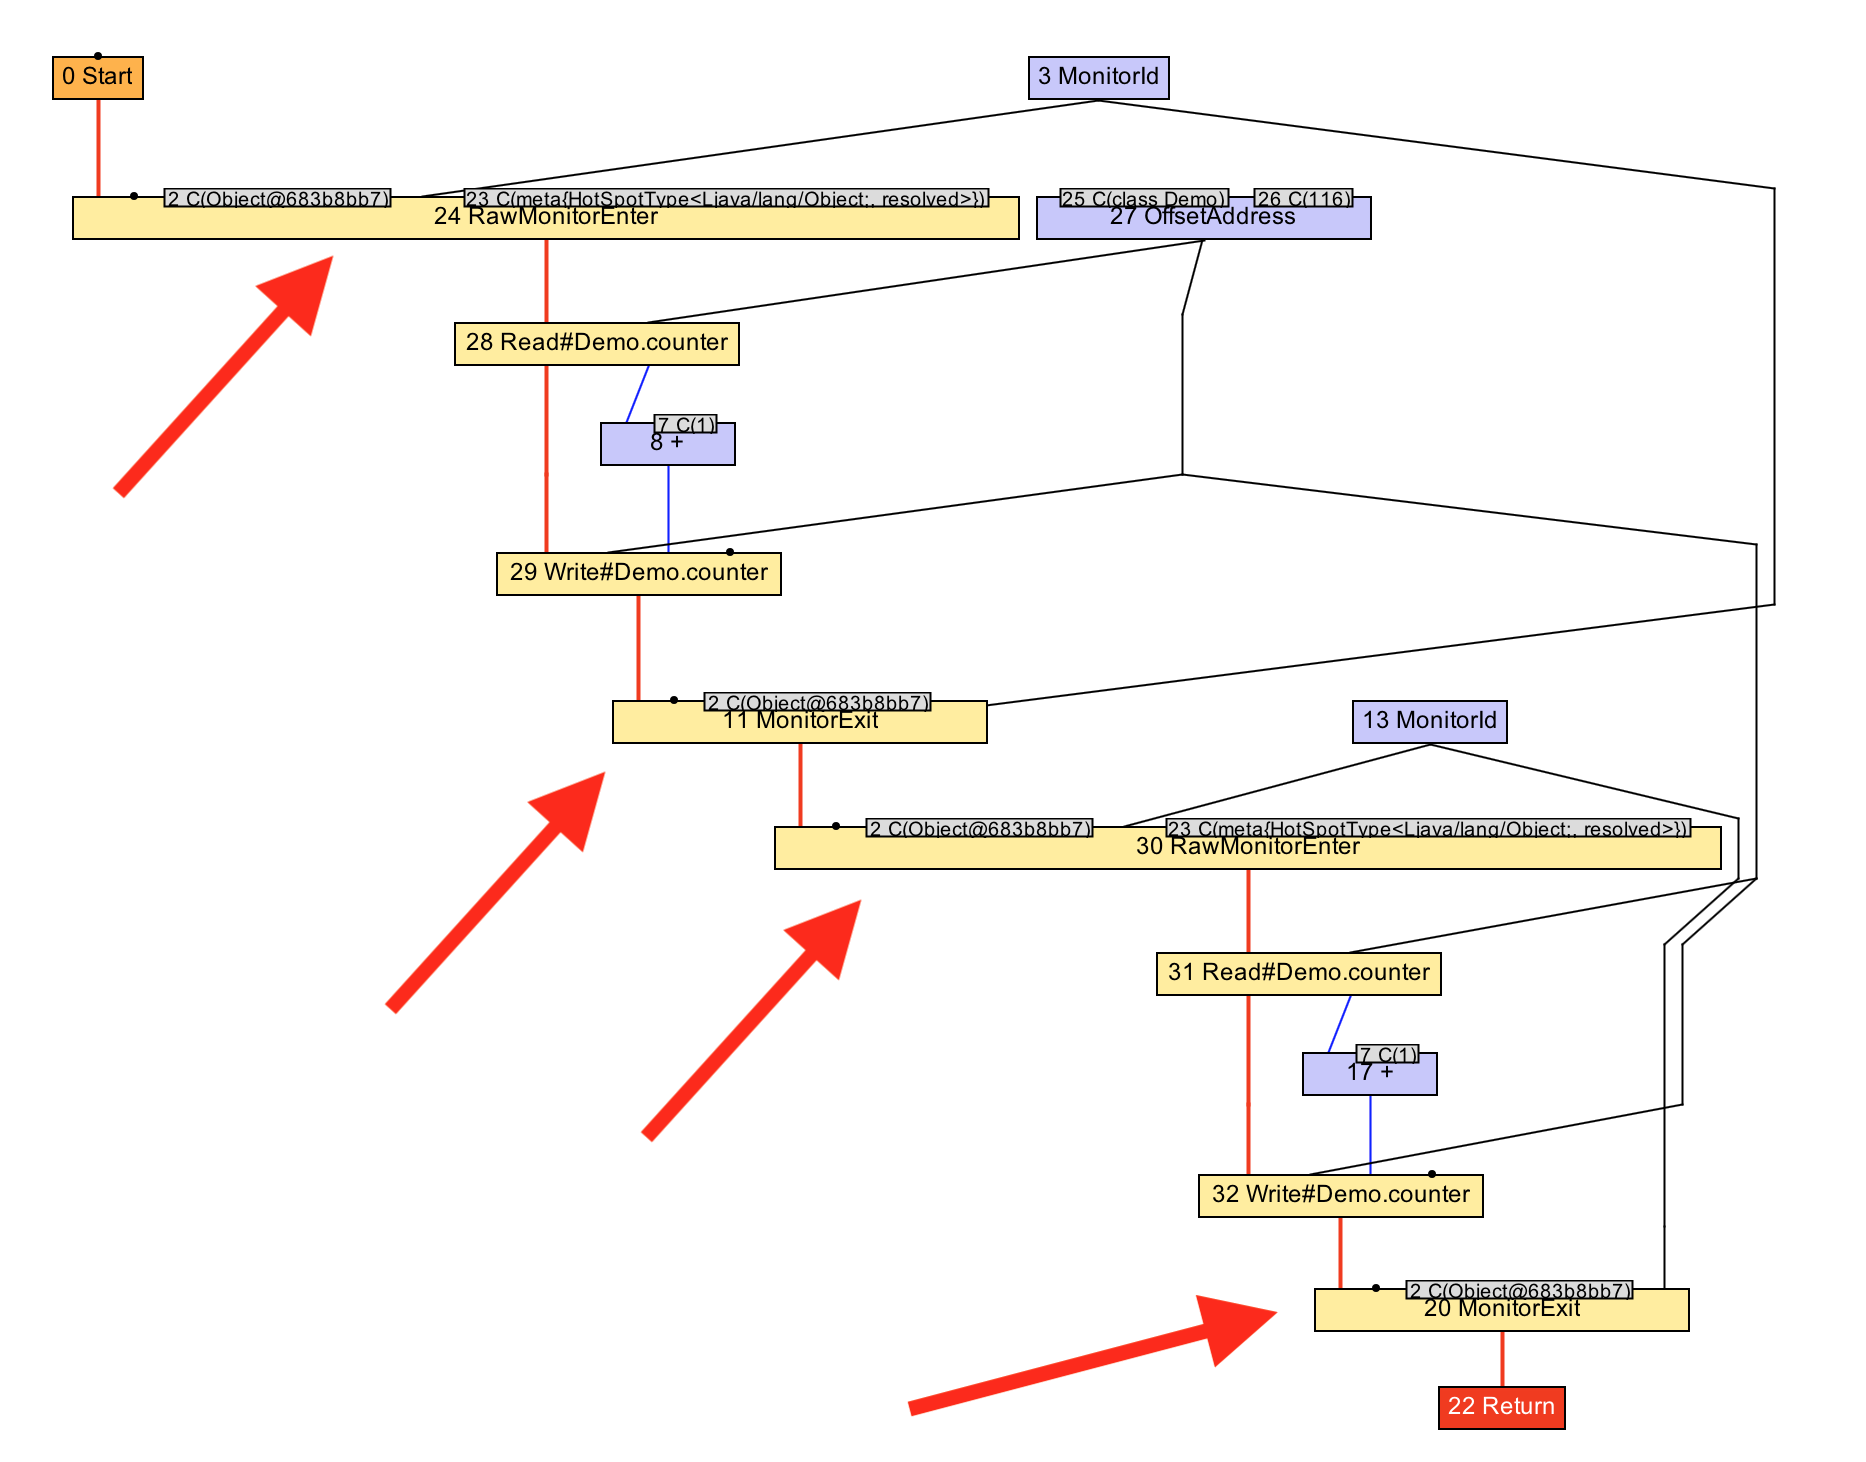
Lock coarsening
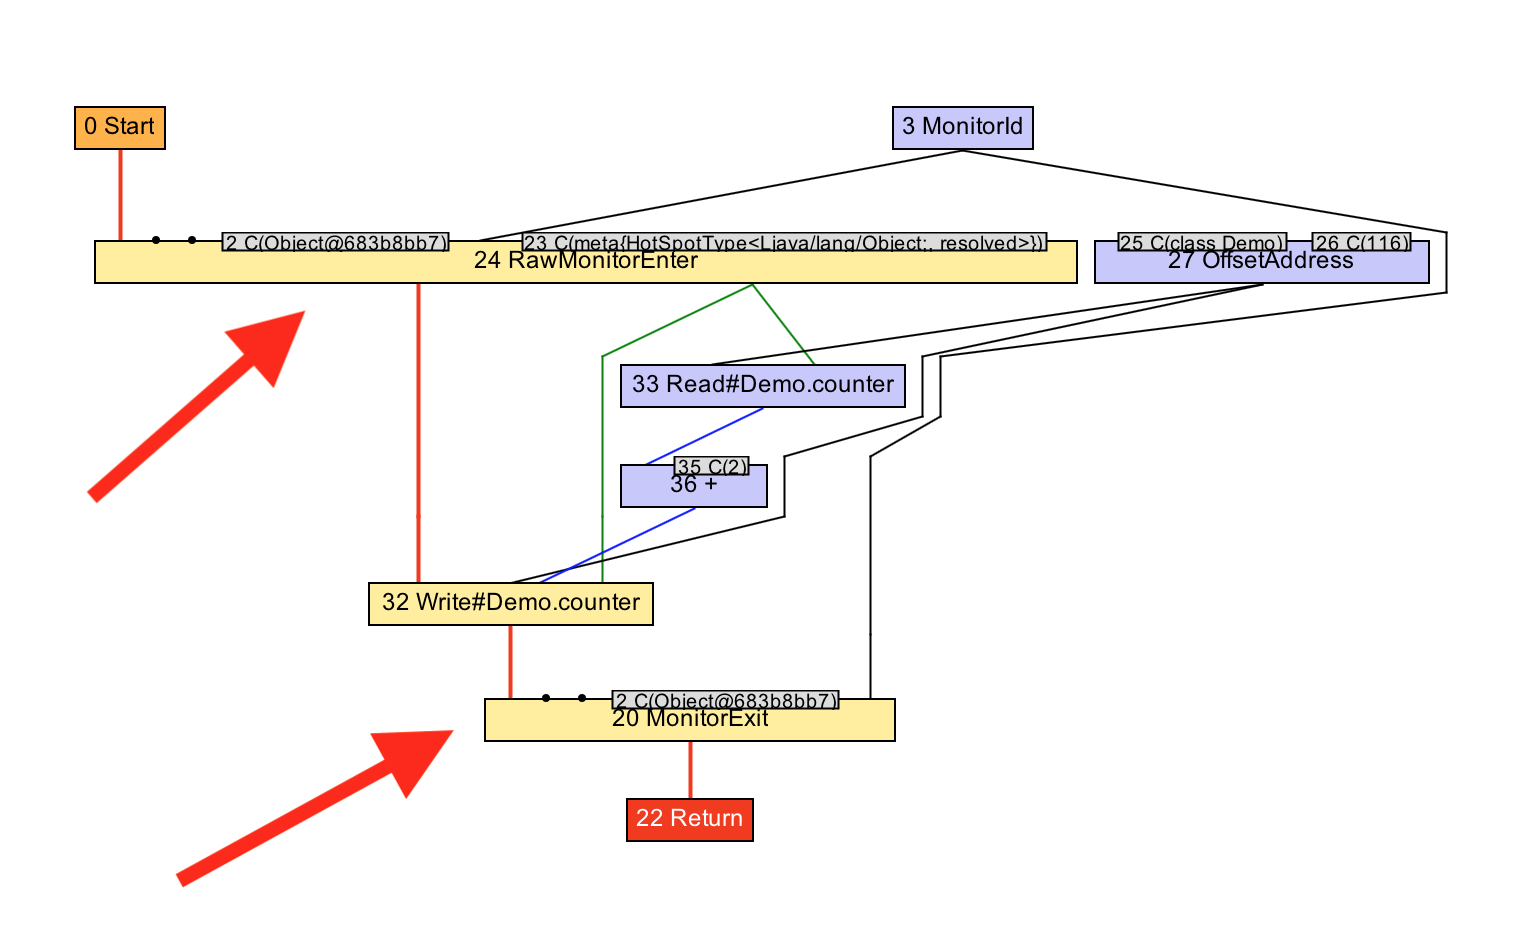
Let’s look at one more complex example. Sometimes people write code that synchronises on the same monitor twice immediately after each other. They may not literally write this, but it may result from other optimisations such as inlining.
void workload() {
  synchronized (monitor) {
    counter++;
  }
  synchronized (monitor) {
    counter++;
  }
}
We’ll de-sugar that and say that it’s effectively doing this.
void workload() {
  monitor.enter();
  counter++;
  monitor.exit();
  monitor.enter();
  counter++;
  monitor.exit();
}
We could optimise this code to enter the monitor just once, instead of leaving it just to enter it again. This is lock coarsening.
void workload() {
  monitor.enter();
  counter++;
  counter++;
  monitor.exit();
}
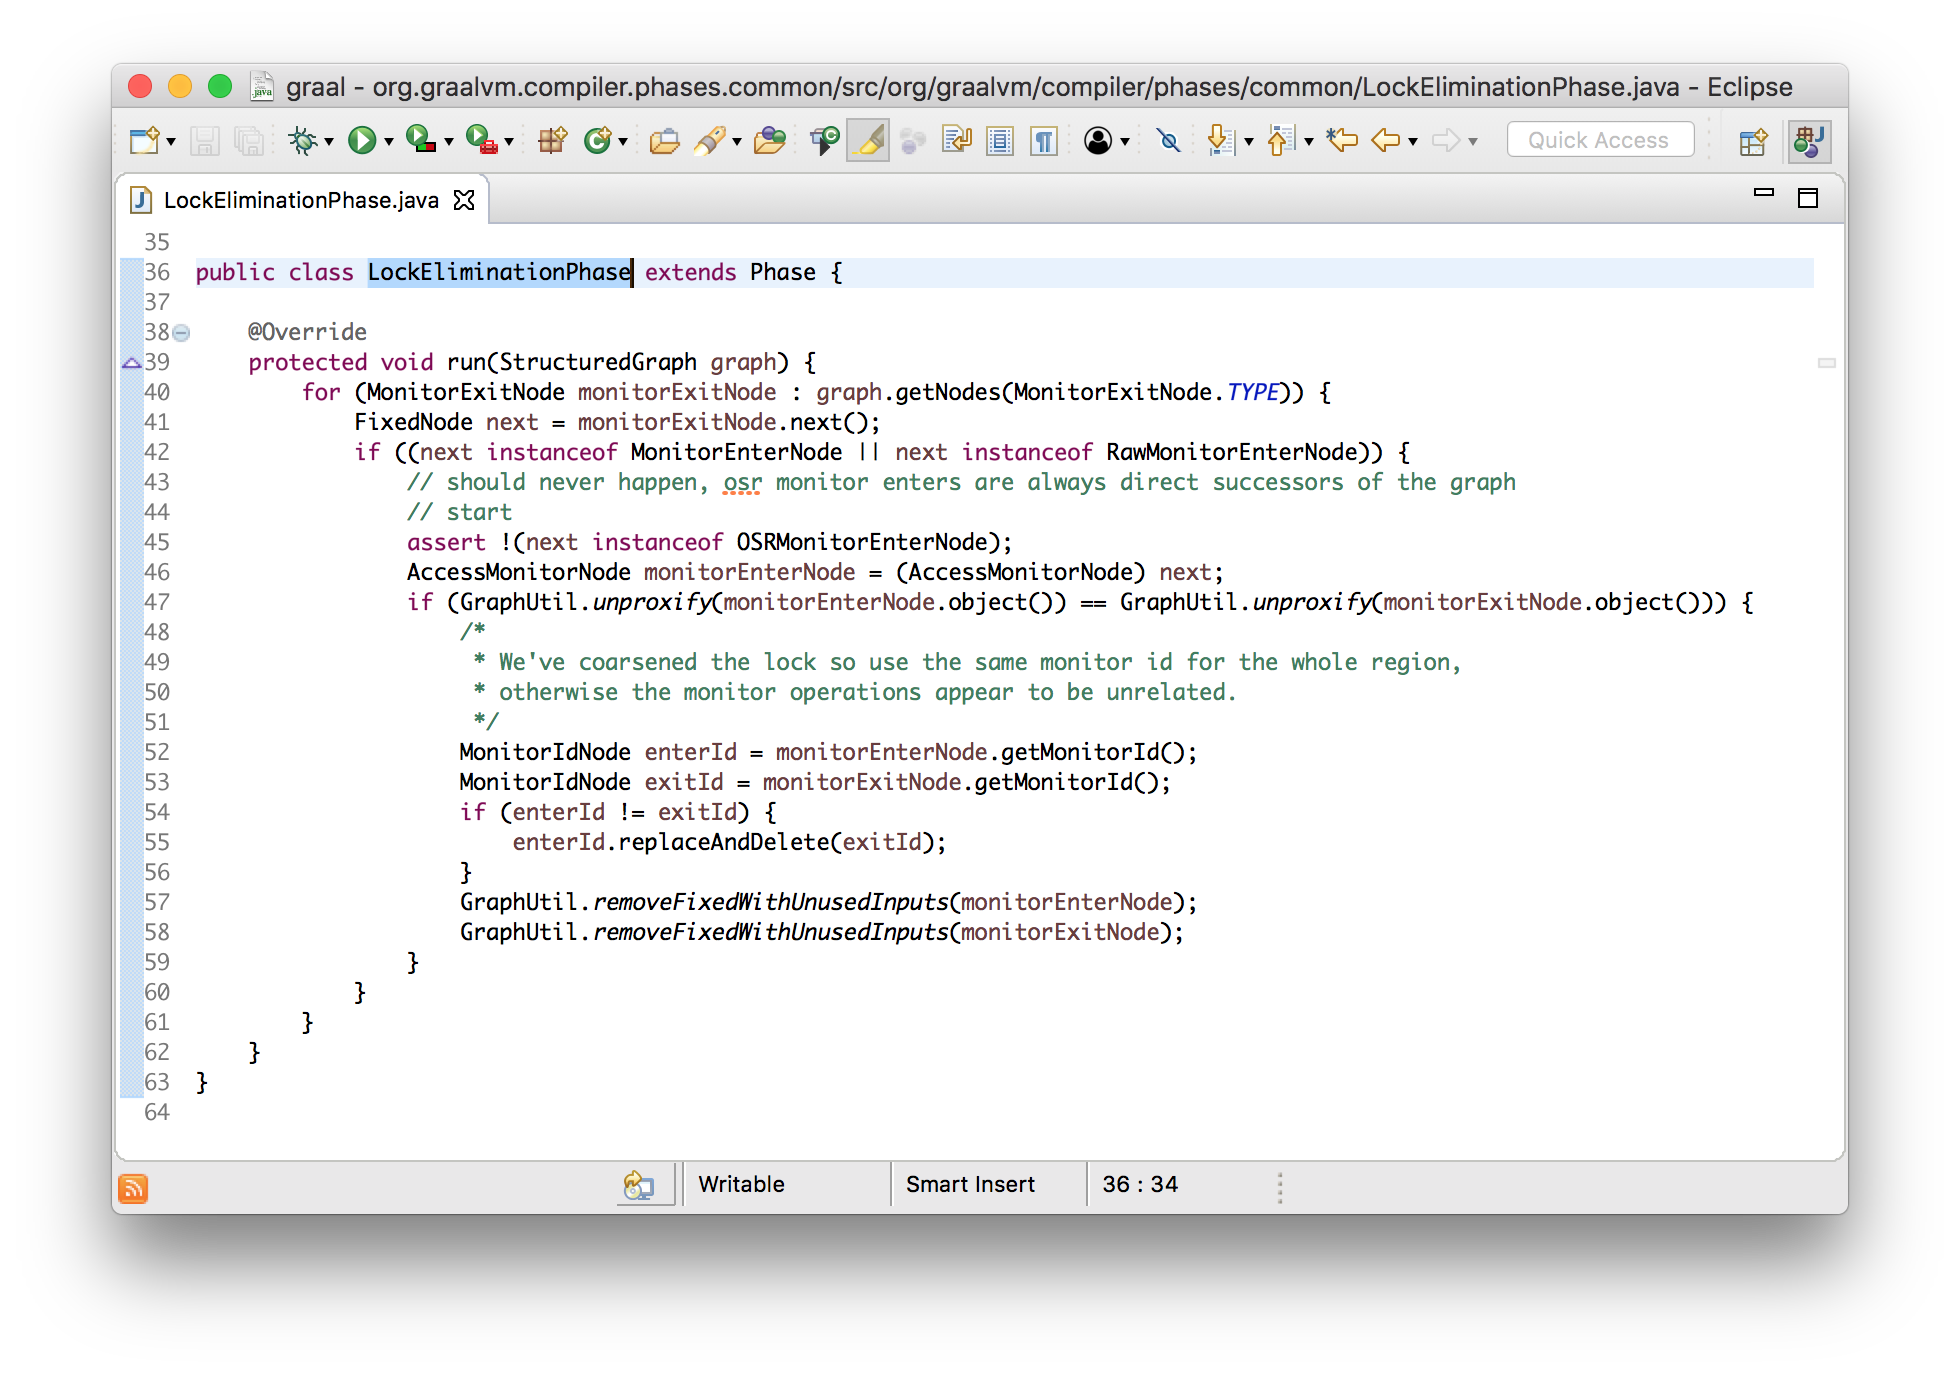
In Graal this is implemented in a phase called LockEliminationPhase. Its run
method looks for all monitor exit nodes and sees if they are immediately
followed by another enter node. It then confirms that they use the same monitor,
and if so will remove them both, leaving the outer enter and exit nodes.
void run(StructuredGraph graph) {
  for (monitorExitNode monitorExitNode : graph.getNodes(MonitorExitNode.class)) {
    FixedNode next = monitorExitNode.next();
    if (next instanceof monitorEnterNode) {
      AccessmonitorNode monitorEnterNode = (AccessmonitorNode) next;
      if (monitorEnterNode.object() == monitorExitNode.object()) {
        monitorExitNode.remove();
        monitorEnterNode.remove();
      }
    }
  }
}
The reason that this is worth doing is that it means less code for the extra
exit and enter, but it also allows us to apply more optimisations such as
combining the two increments into a single add of 2.
void workload() {
  monitor.enter();
  counter += 2;
  monitor.exit();
}
Let’s see this working with IGV. We can see the graph go from having the two pairs of monitor enters and exits, to just one pair, after the optimisation phase has run, and how the two increments become one addition of the number two.
Some practicalities that I haven’t talked about
In giving a high-level overview of how Graal works of course I’m skipping over a lot of important practical details for making it work well and making the code it produces efficient, and I’m actually also skipping some essential things that are needed to make it work at all.
I haven’t talked about some of these parts of Graal because they aren’t as simple conceptually to show like the code I’ve gone through already, but I’ll still point you at where you can find them if you want.
Register allocation
In the model of the Graal graph we have nodes passing values to each over their edges. But what are these edges in practice? If a machine instruction needs data to be passed in or passed out what does it use?
The edges are eventually mapped to the processor’s registers. Registers are like the processor’s hardware local variables. They’re the highest part of the system’s memory hierarchy, above the various levels of processor cache, which are in turn above the system RAM. Machine instructions can read or write registers, and value can so be passed from one instruction to another by being written into a register by the first, and then read from a register by the second.
Deciding which registers to use for each edge is a problem called register allocation. Graal uses similar register allocation algorithms to other JIT-compilers (it’s the linear scan algorithm).
Scheduling
The other essential problem I haven’t mentioned is that we have a graph of nodes without any clear order to run them in, but the processor needs a linear sequence of instructions in a definite order.
For example an add instruction could take two values as input to add together, and if there isn’t a need to execute one before the other - if they don’t have any side effects - then the graph doesn’t tell us which to execute first. When we emit machine code though we do need to make a decision and put one of the inputs’s code before the other.
This problem is called graph scheduling. The scheduler needs to decide what order to run all the nodes in. It decides when to run code based on the constraints that all values need to have been computed by the time that they’re needed for a computation. You could produce a schedule which just works, but you can improve the performance of code for example by not running a computation until the value is definitely needed.
You can get even more sophisticated by applying your understanding of what resources your processor has and giving it work in an order which means those resources are used as efficiently as possible.
What can you use Graal for?
I said at the start of the presentation in the legal slide that Graal is just a research project at the moment, rather than an Oracle product that we are supporting. What do we anticipate could be the applications of the research that is going into Graal?
A final-tier compiler
Graal could be used as a final-tier in HotSpot, via JVMCI, which is what I’ve been showing in my demos. As we develop new optimisations in Graal that HotSpot doesn’t currently have, Graal could be the compiler that you use in order to get better performance.
Twitter have talked about how they’re using Graal for this purpose, and with the
release of Java 9 this is something practical that you can do today if you want
to start experimenting. You just need -XX:+UseJVMCICompiler and the other
flags to get started.
The great thing about JVMCI is that it lets you ship Graal separately from the JVM. You can deploy one version of the JVM, and then deploy new versions of Graal separately. In the same way that you don’t need to recompile the JVM to use a Java agent, you don’t have to recompile the JVM to update the compiler if you are using Graal.
Metropolis is an OpenJDK project to implement more of the JVM using the Java programming language. Graal could be one step towards doing this.
http://cr.openjdk.java.net/~jrose/metropolis/Metropolis-Proposal.html
Your own specific optimisations
It’s also possible to extend Graal with extra optimisations. In the same way that you can plug Graal into the JVM, you can plug new compilation phases into Graal. If you knew that you wanted to apply a specific optimisation to your application you could write a Graal phase to do that. Or if you had some specific set of machine code instructions that you wanted to run you could write a new intrinsic method rather than having to write a native method and call it via JNI.
Charles Nutter has already been proposing doing this for JRuby and has demonstrated it having a positive performance impact when he added a new phase to Graal to relax object identity for Ruby’s boxed numbers. I’m sure he’ll be doing some conference talks about this soon.
Ahead-of-time compilation
Graal is just a Java library. JVMCI provides interfaces that Graal can use to do lower-level things such as installing machine code, but most of Graal is pretty-well isolated from them. That means you can use Graal for other applications beyond being a JIT-compiler.
There isn’t really much difference between a JIT-compiler and a more conventional ahead-of-time compiler, and Graal can be used to build one of those as well. There are actually two projects doing this.
Java 9 includes a tool for compiling classes to machine code ahead-of-time to reduce time needed for JIT compilation, particularly during the startup phase of an application. You still need a full JVM to use this code - it just uses the ahead-of-time compiled code rather than running the compiler on demand.
The version of Graal that Java 9 AOT uses is a little older, and only included in the Linux builds, which is why I haven’t been using it for this demo and instead showed how I’ve built a more recent version and the command line arguments needed to plug it in.
The second project is more ambitious. The SubstrateVM is an ahead-of-time compiler that compiles Java applications to native code which does not have a dependency on the JVM. You literally get a single statically linked executable out of it. You don’t need a JVM and the binary can be as small as a few megabytes. The SubstrateVM uses Graal to do this compilation. In some configurations, the SubstrateVM can also compile Graal into itself so that it can compile code at runtime as well, just-in-time. So Graal is ahead-of-time compiling itself.
$ javac Hello.java

$ graalvm-0.28.2/bin/native-image Hello
   classlist:     966.44 ms
       (cap):     804.46 ms
       setup:   1,514.31 ms
  (typeflow):   2,580.70 ms
   (objects):     719.04 ms
  (features):      16.27 ms
    analysis:   3,422.58 ms
    universe:     262.09 ms
     (parse):     528.44 ms
    (inline):   1,259.94 ms
   (compile):   6,716.20 ms
     compile:   8,817.97 ms
       image:   1,070.29 ms
   debuginfo:     672.64 ms
       write:   1,797.45 ms
     [total]:  17,907.56 ms

$ ls -lh hello
-rwxr-xr-x  1 chrisseaton  staff   6.6M  4 Oct 18:35 hello

$ file ./hello
./hellojava: Mach-O 64-bit executable x86_64

$ time ./hello
Hello!

real    0m0.010s
user    0m0.003s
sys 0m0.003s
Truffle
Another project using Graal as a library is called Truffle. Truffle is a framework for creating interpreters for languages on top of the JVM.
Most other languages which are built on top of the JVM work by emitting JVM bytecode, which is then JIT-compiled as normal. (But as I described when I talked about how the JVM’s JIT compilers were black boxes, it isn’t always easy to control what happens to this bytecode.) The Truffle approach is different - you write a simple interpreter for your language, following some rules, and Truffle will automatically combine the program and the interpreter to produce optimised machine code, using a technique known as partial evaluation.
Partial evaluation has some interesting theory behind it, but practically we can talk about partial evaluation as being inlining and constant folding of a program with the data running through it. Graal has logic for inlining and constant folding, so Truffle can use it to build a partial evaluator.
This is how I was introduced to Graal - via Truffle. I work on an implementation of the Ruby programming language called TruffleRuby that uses the Truffle framework, and so also uses Graal. TruffleRuby is easily the fastest implementation of Ruby, often 10x faster than other implementations, while still implementing almost all of the language and standard library.
https://github.com/oracle/truffleruby
Summary
There’s one key thing that I really wanted to get across in this talk - a Java
JIT-compiler can be treated as any other code would be. JIT-compilation has a
lot of complexity - mainly inherited from the complexity of the underlying
architecture and also because we want the generated code to be as efficient as
it can be without spending too much time in the JIT - but it’s still a
high-level task. The interface to a JIT compiler isn’t much more than converting
the byte[] of JVM bytecode to the byte[] of machine code.
This is a task which is well-suited to being done in Java. The actual compilation is not a low-level task needing a low-level and unsafe systems programming language like C++.
The Java code in Graal is not magic. I won’t pretend it’s always simple, but much of it an interested novice can read and understand.
I’d encourage you to go and look yourself using the pointers I’ve given you. If you start with the classes I’ve shown then you won’t be lost when you first open Eclipse and see the long list of packages. From these starting points you can follow definitions, navigate to callers, and so on to learn more about the code base.
If you’re already used to trying to control and tune the JIT, using tools for the existing JVM JIT-compilers, such as JITWatch, then you may find that reading the code will help further understand why Graal compiles your code as it does. And if you find things aren’t working as you want, you can indeed change Graal, and just relaunch the JVM. You don’t even need to leave your IDE to do it, as I showed with my hello-world example.
We’re working on some amazing research projects using Graal, such as the SubstrateVM and Truffle, which really change what could be possible in Java in the future. These are made possible because all of Graal is written in plain Java. If we used something like the LLVM project to write our compiler, as some other companies propose, then it’s not as easy to re-use the code in some many contexts.
And finally, it’s now possible to use Graal with an unmodified JVM. With JVMCI now being part of Java 9, you can plug in Graal like you plug in an annotation processor or Java agent today.
Graal is a large project with a lot of people working on it. As I said I don’t really work on Graal myself, I’m not much more than a user of it, as you could be!
- More information about TruffleRuby
- Stamping Out Overflow Checks in Ruby
- The Future Shape of Ruby Objects
- Seeing Escape Analysis Working
- Understanding Basic Truffle Graphs
- Context on STM in Ruby
- Seeing Register Allocation Working in Java
- Understanding Basic Graal Graphs
- Understanding Programs Using Graphs
- Low Overhead Polling For Ruby
- Top 10 Things To Do With GraalVM
- Ruby Objects as C Structs and Vice Versa
- Understanding How Graal Works — a Java JIT Compiler Written in Java
- Flip-Flops — the 1-in-10-million operator
- Deoptimizing Ruby
- Very High Performance C Extensions For JRuby+Truffle
- Optimising Small Data Structures in JRuby+Truffle
- Pushing Pixels with JRuby+Truffle
- Tracing With Zero Overhead in JRuby+Truffle
- How Method Dispatch Works in JRuby+Truffle
- A Truffle/Graal High Performance Backend for JRuby